2025 Ski/Split Program
Hey folks! Firstly let us thank you for your voluntary contribution to this project. Your gift to the frothing unwashed BC masses makes a real contribution! Sharing knowledge is helping people make better decisions and have better experiences when left to their own devices. And lest face it, skiing with rad people in rad places is a deep enduring stoke! Wether its with the guide cohort in training or the participants on tours!
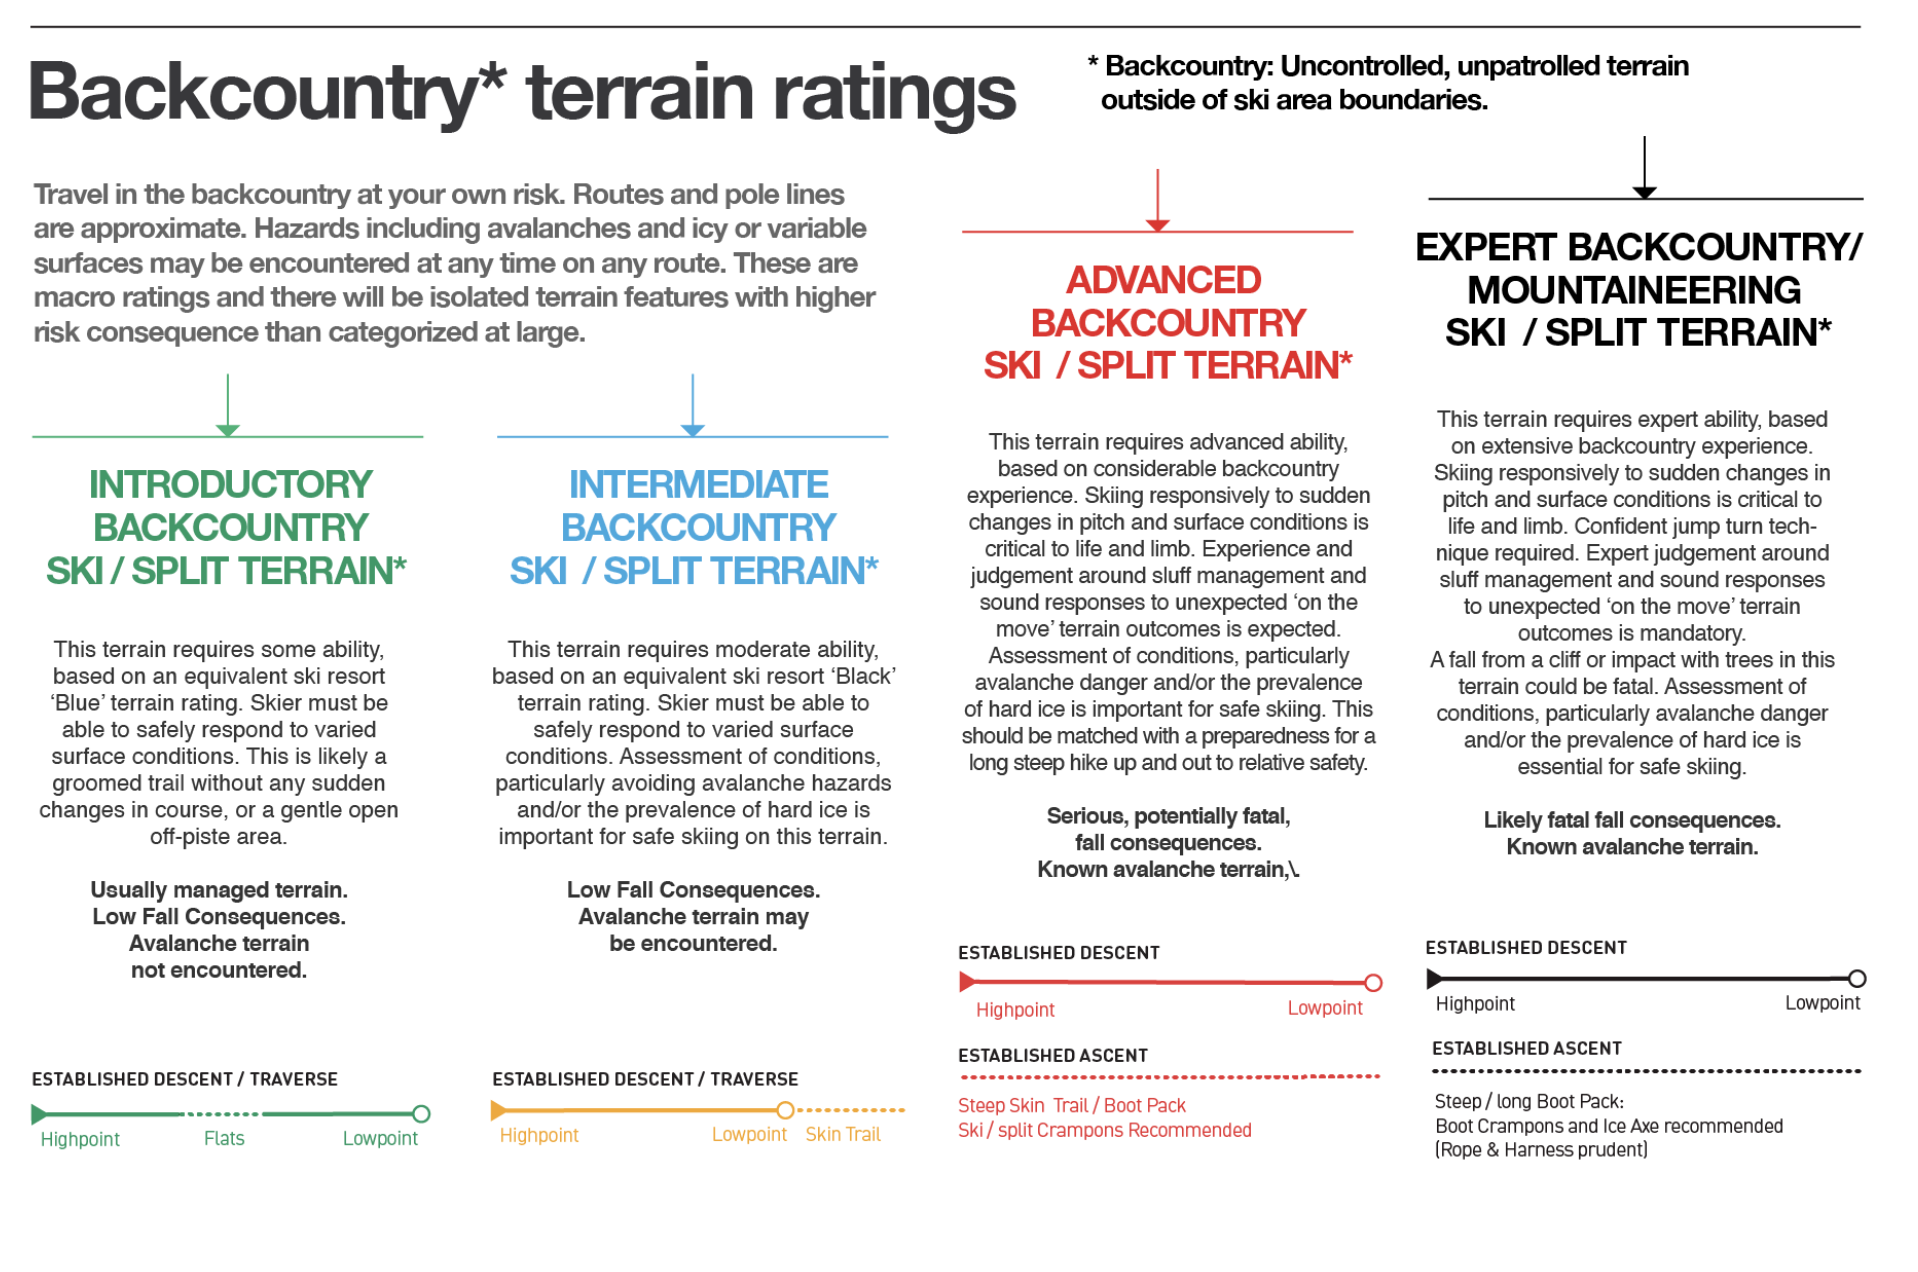
This year we are introducing the advanced terrain category. We are inviting you all to a training Camp-out with pro guides to coach us all. And, let’s be honest - a skilled clique of crew who love to rip around in the very serious business of research and observation is pretty good. The following is an outline of what we are planning for the full program.
Jess Wu - Festival Ski / Split Tour Co-ordinator
Simon (Wombat) Murray - Festival Tour Program Director
James Ramsay - Comms and Field Ops Coordinator.
Field Ops/Obs Team
This year, as we enshrine a broader understanding of the ‘behind the scenes’ risk management of the program we will be broadening the ‘field observations team’. Anyone wanting to participate in the Advanced Tours is automatically in the wheel house for this as part of the ‘daily process’. It will involve early starts (5.30am) so sleepy heads need not apply. Shovels, thermometers and note taking. Training for this will be conducted at the Camp-out, and if you are keen, you need to overnight both Friday and Saturday to maximise the obs times both mornings. Then the same for the festival dates. All welcome to participate in the training for this, mandatory for Advanced Tour guides.
Guide Logistics & Participant Safety Briefing
We are moving away from the ‘townhall’ safety briefing session as we will be using two venues for staging, The General (Genny) and the new Mt Loch Visitor Centre, at three different time slots. These will be presented by a member of the Field Team, at the muster, pitched at the relevant groups level of understanding (Intro/Intermediate & Advanced).
So prior to all this, once the Field Observations are completed, the Field Team will prepare the briefing and then present it at 7.00am for the guides.
Available terrain will be allocated to guide teams. This year we are hoping to eliminate some ambiguity on the day by having defined Lead/Tail teams that are decided in training and consistent for briefings and on tours. Availability on both days is our preference. Guides who can help out at the festival but cant make it to training will be in charge of the Intro tours. The exception to this being the Advanced Tails who will work as a team in a field ops capacity, And Field Ops who rove like lone wolves on the plain!
Introductory Workshops Tours.
Based off the feedback, we are changing the Intro Tours to a ‘roving workshop’ model. This is designed to really bone up on the basics. The distance is shorter, its not ski instruction, its touring introduction. People want to know how to transition, kick turn, spot a kick turn, safety ski, transition mid slope, boot pack, navigate in a white-out and read the MSC bulletin. Almost as a dot point list of demonstrations, conducted as you move through some super mellow terrain.
The introduction ski tour is made to get you started in the backcountry. No such thing as stupid questions. Just open ears and an aptitude to learn more. We will be accessing gentle backcountry glades surrounded by impressive alpine terrain to set your sights for future adventures. The guiding will be elementary and we will travel with a view to learning and really nailing new travel techniques.
Introductory Workshop Tours Start at the General at 9am for Participant Briefing / Gear Check. We will have Three ‘Products’:
Strictly Split - Mix Gen - Lead/Tail + 6 Particpants
Strictly Ski (& tele) - Mix Gen - Lead/Tail + 6 Particpants
Womens Only - Mixed Sticks - Lead/Tail + 6 Particpants
$35 fee? TBC
Terrain: Higgi / Brides, Eagle Ridge, Christmas Hills
Intermediate Tours
The meat and gravy of the festival. This will be the standard format with the exception that one of the field teams will be traveling with you! Yep, too much talent under utilised and standing around. We will have emergency caches still, un manned. So it’s effectively a 2:1 guide ratio. The Field team member will wrangle the TSA (total situational awareness) elements for her/his party and communicate with the other tour teams.
The intermediate ski tour is really about exploring new terrain with a local. The tour will be based on the conditions of the day, choosing the best available terrain to get out on. We'll be practising safe terrain management and working together to ensure that everyone gets to lay down some fat tracks and return safely.
Intermediate Tours Start at the Loch Visitor Centre 9am for Participant Briefing / Gear Check. We will have Four ‘Products’:
Strictly Split - Mix Gen - Lead/Tail + 6 Participants + 1Field Team
Strictly Ski (& tele) - Mix Gen - Lead/Tail + 6 Participants + 1Field Team
Mix Stix - Mix Gen + Epic Pass: Lead/Tail + 6 Participants W/ Epic Pass + 1Field Team
Womens Only - Mixed Sticks - Lead/Tail + 6 Particpants + 1Field Team
$45 fee? TBC
Mt Loch - Cobungra - Golden Point (with epic pass), Eagle Ridge, WDH - Pumphouse Drop - Brides Spur, Razorback - Dippers & Telleson Point
Advanced Tours
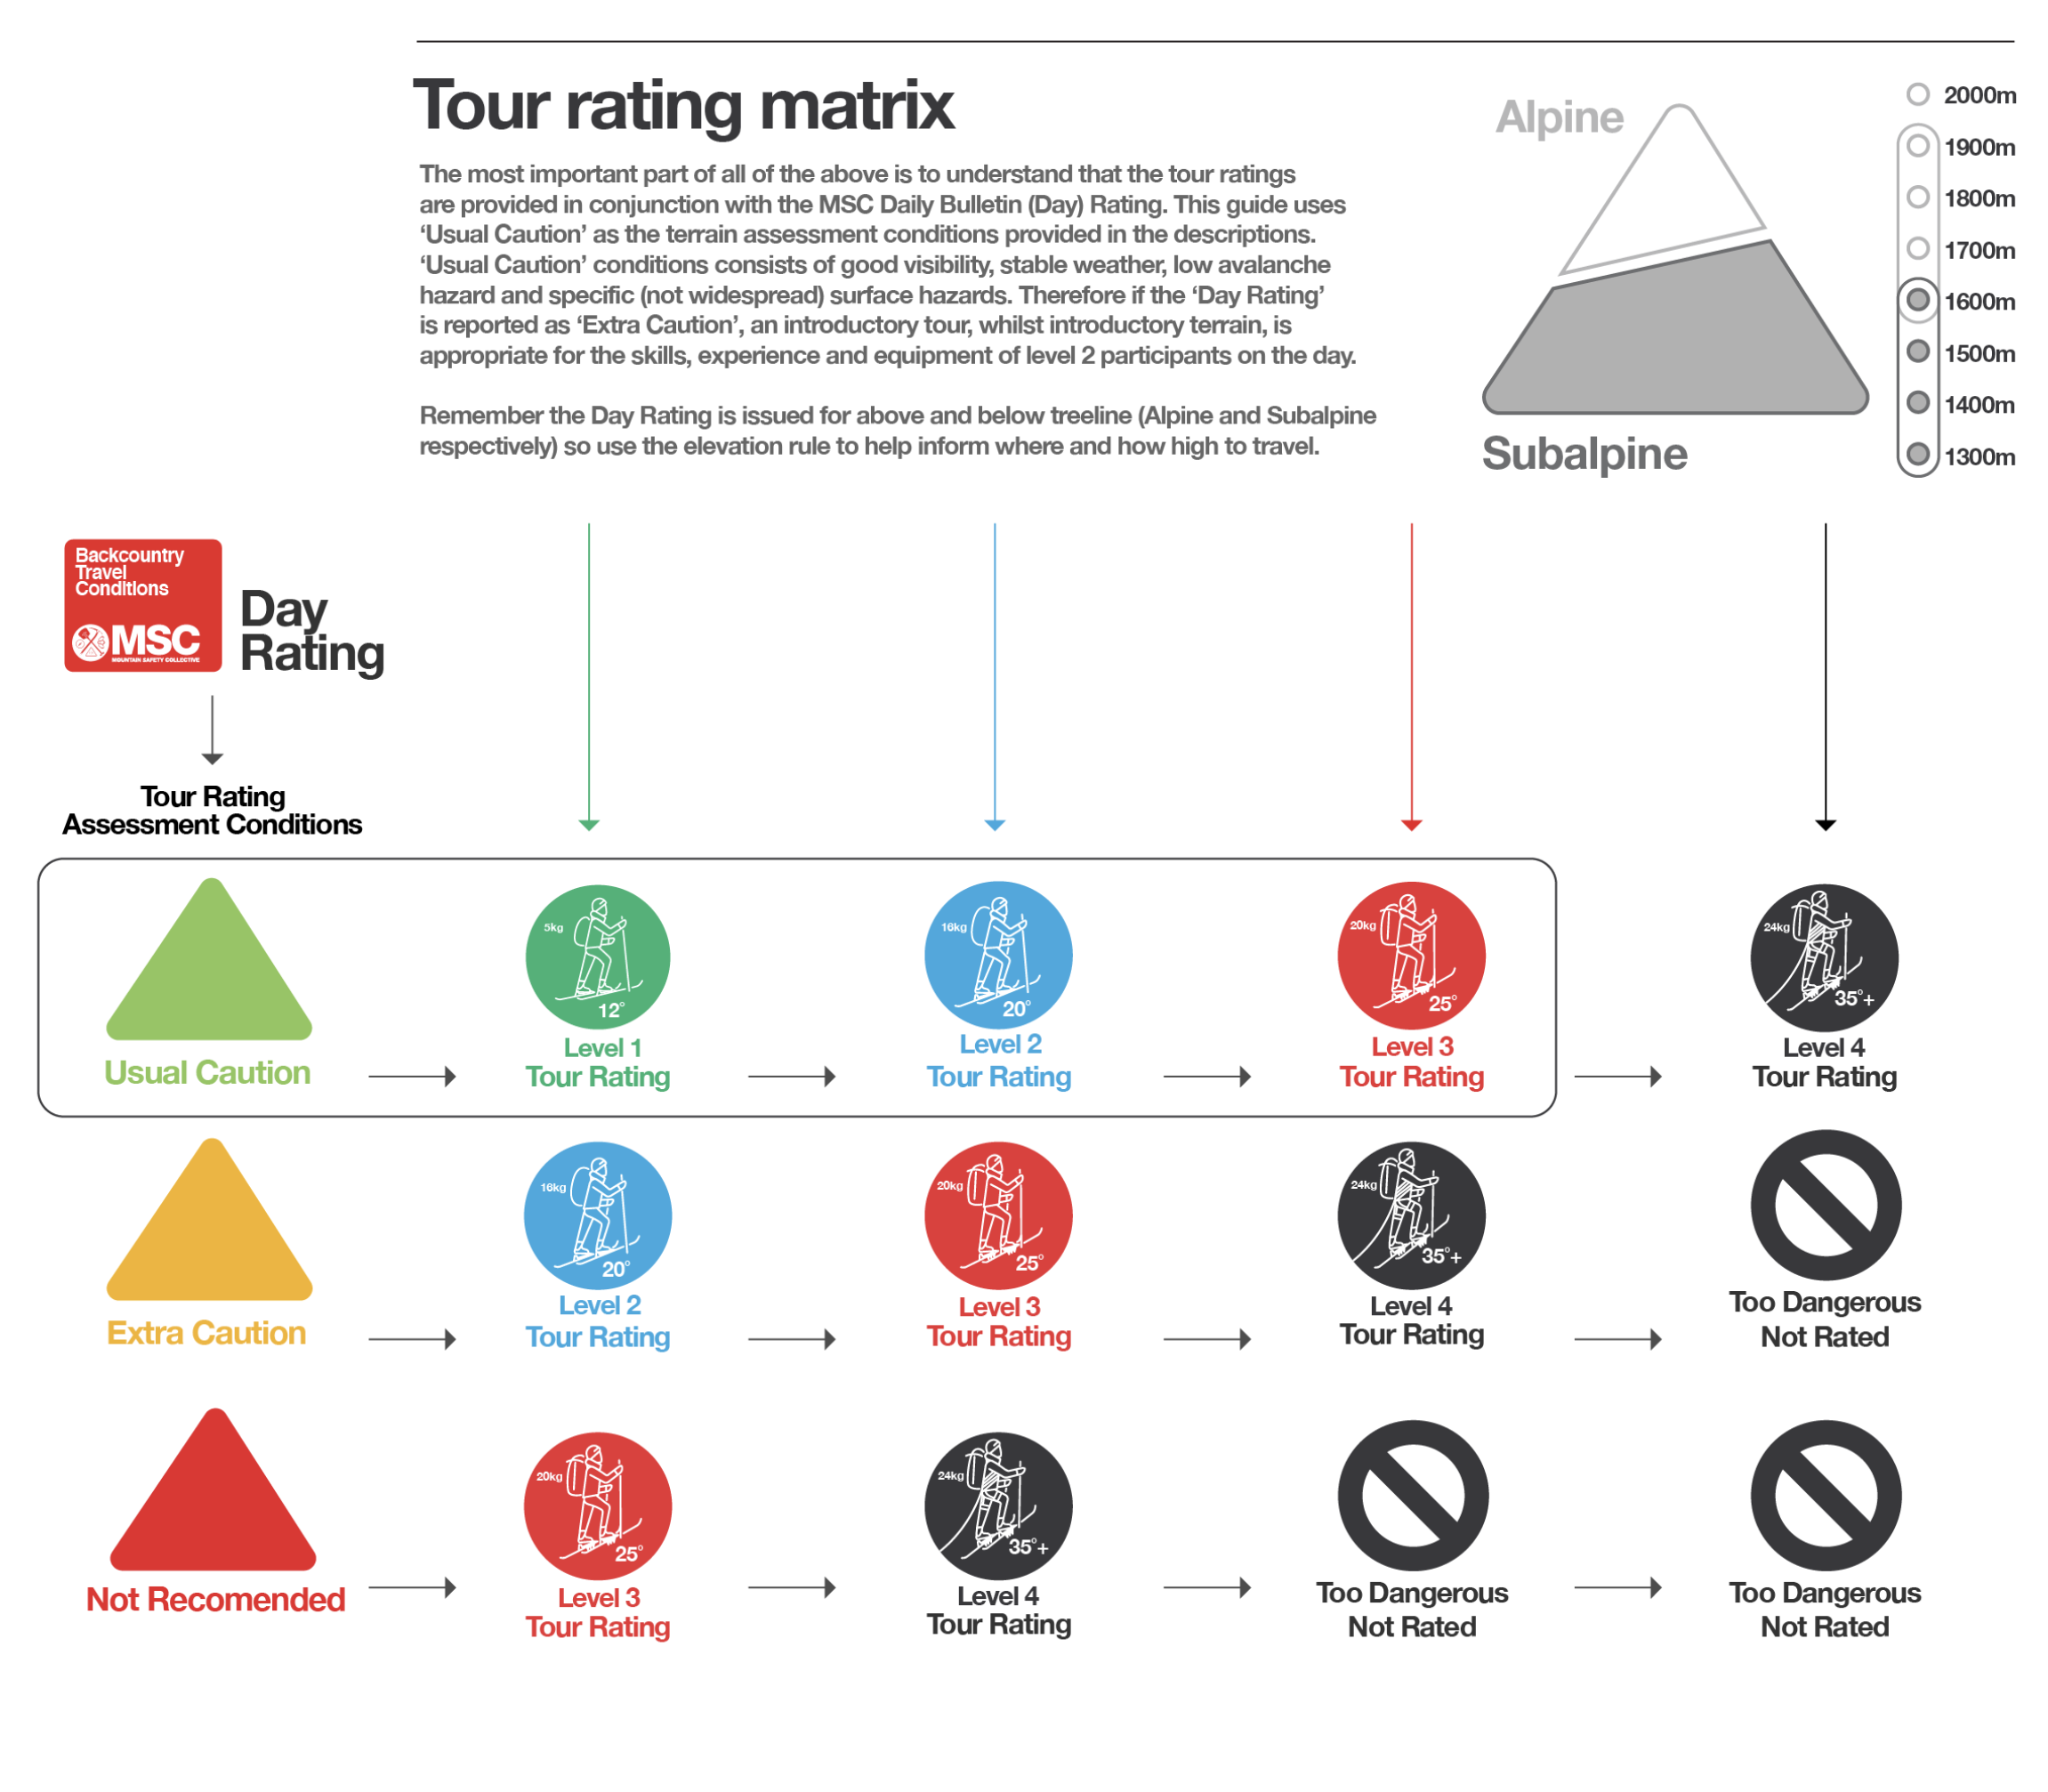
The new product. Advanced terrain is the bigger steeper, avy prone and ‘long fall’ stuff. Pro-lunteer guides (Ops1/WFA and/or ASPA) and seasoned cohort tails (AST1 / WFA and/or ASPA). Safety is a huge NUMBER ONE!. Guides and participants all need: both boot and ski/split crampons, either an ice axe or a whippet, a climbing harness and two locking carabiners + 1m lanyard / sling. Plus, importantly the familiarity to not only use them but with proficiency. The Camp-out / Patrol / MSC obs vigil is what makes this product a reality and we will follow the protocol of the MSC travel advice of ‘usual caution’ as our only Green light. Participants will be vetted by previous inclusion in Intermediate tours.
Advanced tours are available this year. These are days with bigger, steeper terrain. With that comes a responsibility from both the festival and you. Safety is number one. You will need to have a minimum of AST1 (or equivalent) and some extra kit: both boot and ski/split crampons, either an ice axe or a whippet, a climbing harness and two locking carabiners + 1m lanyard / sling. Plus, importantly the familiarity to not only use them but with proficiency. Also prior participation in a festival run intermediate tour is highly sought on application (so remember that guides name and where you went). There’s the possibility that given conditions on the day these will ‘fall back’ to intermediate terrain, regardless there will be an expectation that your fitness supports days of 800m+ of vert ascent and descent. So please be honest with yourself and us on the day.
Advanced Tours Start at the Loch Visitor Centre 8am for Participant Briefing / Gear Check. We will have Three ‘Products’:
Strictly Split - Mix Gen: Lead/Tail + 6 Participants
Strictly Ski (& tele) - Mix Gen: Lead/Tail + 6 Participants
Mix Stix - Mix Gen + Epic Pass: Lead/Tail + 6 Participants
A spare is included if we have the resource on the day.
$85 fee? TBC
Terrain: Dargo Bowl / Harris’s Horror - Drift Creek / WDH - Stalkers / Pink Hamburg - North West Spur / Mt Loch Bowl - Mollys / Diamatina Face - Money Shot
Note: All tours ‘turn around time is 2.30pm, with tour conclusion, head-count and debrief at 4pm.
Drinks at the Genny at 4.30!
Event Map for reference
If you need more info / refresher on any of the details above there is heaps more information below the form.
This is a diagram of participant competencies, you should be the next notch as the guide / mentor in this scheme.
Guiding Principles:
This is an outline of a few key principles that are really handy to understand when you are ski touring in a group. As social animals we all need a semblance of order, and with that every tour group needs a leader and a tail. Depending on how formal the touring is (commercial or recreational) this nomination is done for you or perhaps it’s on a daily voluntary rotation (particularly on big extended multi day trips). Sometimes the tail is actually the one with the most experience in the area or with route finding, while the leader is a boss at avalanche rescue or first aid, or you are all equally matched but this nomination will save time in decision making processes if something does wrong. Leader (1st command) and Tails (2nd Command) are roles, not personalities. What is clear is that one of these two roles opens the route, the other is at the back of the group. In avalanche terrain we add the the leader assumes the coordination of ‘the search’ while tail coordinates outside communication and extraction, shovelling and recovery (first aid). In the description below the Red type is specifically for leaders and tails, the green is for all introductory and intermediate participants in general to remember as they may be unfamiliar with the higher level concepts . All of it is handy but remember not to fall into a worm hole with the video links.
Leader and Tail responsibilities
Key Points
• Lead or tail opens the route
• Lead or tail can do ‘sweeps’
The leader makes the call on the functions to be performed.
Wether by design or just group dynamics a leader is usually someone who’s got at a minimum, familiarity and experience, or through research, with the terrain that a party is entering. And all the safety training to provide leadership in choosing a safe route and an emergency should one arise. In general an ‘Advanced’ ski tourer.
Quick scenario about dynamic leadership: If this leader positions herself at the back of a column on a descent she is still the leader. She’s watching to ensure the party are all ok while she coordinates the shuttling of the party via two way radio comms with the Tail who in this case went first as it was low consequence terrain. Then the leader followed along behind the group called a ‘sweep’. The sweep is an essential function of a tour group. In this instance the leader (the best skier) did the sweep because the surface conditions were funky and the light was flat so she feared someone might fall, this, over route finding was her biggest safety concern. The sweep is not specifically the role of the ‘Tail’. In this case the ‘Tail’ who is usually ‘second in command’ (2IC) went first as he had some specific terrain knowledge that was helpful (he’d spied a river crossing from earlier in the day), and it was low consequence terrain. Best practice is to put the people with the skills for the challenge/concern ready to respond. Most importantly: all this happened at the leaders instruction. The leader makes the call on the functions to be performed. That is her role. A leader is level headed and open to concerns or other points of view, all the while she will ask the team if they feel comfortable with the directions, the intention and the general vibe of whats going on… No expert halo here.
The party members need to be aware that a) someone will be opening the route (uphill and down) and b) someone will be following with a sweep (again uphill and down). So in that knowledge party members know they need to stay visible to the sweep, or they will could be missed/lost, if they’ve veered too far from the groups route. Usually easy on the uphill because we all follow one skin trail (mindfull of sucker tracks), harder on the down, in low visibility or in the trees. Follow instructions, keep together in obscured visibility with the strategies outlined below.
Shuttling the party
When using two way radios always transmit callsign before message.
‘Brief’ the ‘sweep’ on distance / elevation / bearing (skiers right) / hazards, and on low angled terrain the frequency of following party members (half minute intervals as standard).
Confirm or adjust ‘Brief’ at bottom of descent then call for ‘Skier Up’. Sweep calls ‘Skier Down’
Regroup and repeat.
NOTE: Its worth employing these techniques and practising them on all terrain as a standard mode.
Morse Code whistle calls:
••– skier ‘U’p
––• skier ‘D’own
•••• ‘H’elp
– ‘T’ail down
Sometimes on descents, due to the risk associated with skier-skier collisions, avalanche hazard and visibility you will find that shuttling is a great risk mitigation strategy. Under clear direction, the person opening the route (leader in this instance) will brief ‘the Sweep’ (the Tail in this instance) on where she’s headed, how far, and the characteristics and hazards she’s anticipating: ‘I’m going to head on a 150m downhill traverse to the skiers right with about 50m of elevation loss, looking out for icy patches in the shade and ending on the far side of the gully. I’ll stop 50m distance, before the gully and have visual on it. One skier at a time. ’
Once the leader has completed this leg and found her safety position she will radio any updates to her brief and then call ‘Skier Up - standing by’. The tail will instruct the readied party member on the brief and then start the skier/boarder on the descent. In reply, the tail radios ‘skier one down’. The leader, once they can see the skier, calls ‘Skier one visual - skier up’ and with that the tail sends another.
On introductory and intermediate terrain the leader will often instruct ‘half minute intervals’ and then the tail calls ‘Skier One down’ etc with the lead calling ‘visual on one’ etc as they come down to her.
A mountain may be descended in a series of shuttles or ‘Legs’ at the leaders discretion, dictated by terrain and visibility. As a participant, it’s important again to follow the instruction, indicate and speak up if anything is unclear,
When radios fail (and they do) the same process of ‘Skier up’ and ‘Skier down’ can be done using whistles (everyone needs a whistle). The ‘Up’ call is two short blasts followed by a long blast: ••– which is U for Up in morse code. The responding ‘D’ for down is the opposite, two long blasts followed by one short: ––• and these two can’t be confused. ‘T’ for ‘tail down’ is one long blast: – and the tail can issue intermittently 20 second apart a ‘T’ (one long blast) as they ski down to notify the group of his position. Party members with whistles might also use four short blasts ‘H’elp as: •••• if needed.
Travel with a ‘Slip Stream’ (shunting)
• Important: Don’t ‘shunt’ off until your follower is nearby.
• Generally follow the leaders track very closely if not entirely in their track.
• Leaders, make sure you leave a ‘slow’ track by choosing low angles in the terrain, your followers will be increasingly quicker by a factor of 2.
• A step turn is always an option.
Like a shuttle, a ‘slip stream’ or ‘shunting’ is a way of travelling which mitigates either poor or obscured visibility. The person setting the route, uphill and down, will ski a short section and then instruct the next party member to join them verbally usually with a short loud ‘Yep’. IMPORTANT: Don’t break the chain. The person following then also instructs their follower in turn to join them, moving off their position off as the follower arrives. The party then moves as a column (or a caterpillar really) with each person going to the next ‘shunt’ distance at the instruction of the person in front of them. Usually following exactly in the ski/skin track of the person in front. If the conditions are really slick, a step turn might be favourable (safety skiing) to a plough or parallel turn on the downhill. Also, skins might be a good addition in tough conditions (so long as the split-boarders in your party can also ski). The poorer the visibility, the shorter the shunts.
WARNING. Very Important: The person breaking trail for use as ‘slip stream’ travel must pioneer the route as a lower (slower) angle knowing that those following will travel much faster on in the ‘slip-streamed’ track, hence the name. 2X+ faster!!! Skiing an existing track is twice, if not more, than setting a track in fresh untracked snow.
Slip stream and shuttling are two seperate modes of travel. And the lead will indicate this to the party at the start of said ‘shunt’. The opposite of such controlled modes of travel is a ‘Freebom’ in reference to the annual Buller ski event which explores the line between control and chaos. Let’s avoid the ‘Freebom’ in the backcountry… thats when people get lost or left behind, collide or worse still, set off big slides.
How together is together?
When travelling in the backcountry, the leader is likely cognisant of a whole bunch of varied hazards like icy shady aspects, wind loading, terrain traps, creek wells, yetis and more. Even in some introductory terrain a touring route might come close to a cornice top, or worse still an icy rollover. The leaders route will keep you away from those hazards and it’s implied that you ‘follow the leader’. But how closely. In exposed areas and avalanche terrain we are talking pretty close. The proximity of your trail and that of the leader should be such that you could tap ski pole tips with the leader if they were travelling with you. That’s a range of no more than 4m. When there is a very risky area the leader will of course stop, boot-pack or simply usher her group away from an obvious hazard. Or alternatively usher the party, like an air traffic controller (two poles rising and falling vertically, pointing at path) through a gap.
Up hill it’s generally considered that there be 20 paces between people on the skin trail unless instructed to huddle tighter. Tail gating or skiing over other peoples ski tails is super not very cool? Way too close.
Engineering the Backcountry: The gentle art of establishing a skin track.
Often if your party is ‘first in’ to an area you will need to pioneer a new skin track. It’s really important that the effort that you will be going to, is an investment for the rest who will follow. The key component to this is to make the track at the right rate of incline. This is somewhere around 10˚. At this rate of incline a normal fit human can climb for hours without diving into deep energy reserves. When you look at the ski mountaineering bindings this confirms that thesis as they rarely have ‘high-risers’ on the heel piece and the angle of ascent is at 10˚. In the field you can work this out roughly as gaining a ski stock (waist height) in 12 paces. When a skin track is set too steep the parties safety and efficiency becomes solely reliant on the quality of adhesion between three elements: ski, skin and snow. These are all variable so don’t push that safety margin, stay low angle. Also, set the skin track in places that aren’t attractive to the downhill traveller like in or near tight trees or better still tight trees on ridges (nobody ever skis those lines).

Of course there will be sections that you just need to ‘bust-out’ of the spot you are in, but be mindful of others and be aware that steep skin tracks are a waste of not only your energy but all that (choose not to) follow. The turtle always wins on the skin track as we see in ski mountaineering racing.
Lastly, if there is a skin track in, and it’s good (not set by some donkeys with swollen egos and thighs) then use it and save as much terrain for the next party down as possible.
HOT TIP!
Skin-track teamwork: build a bench for your splitboard buddies and feel the warm glow of mountain love!!!
If you are in a mixed discipline tour group, with splitboarders and skiers, put the skiers ahead of the splitters on the skin trail and instruct the skiers to widen the skin track by cutting another half a ski width off the uphill side of each track. Particularly handy on steep ground. For this the splitboarders will reward the skiers with foot massages and other-worldy delights at the lodge/hut/tent for saving their floppy boarded behinds. Also, in general instruct split boarders to always use their crampons on climbs, this compensates for the ‘wash-out’ on skin track traverses.
Safety on the switchbacks: Spot your kick turns with nature or in person
The one thing that sees more skiers come unstuck than any other requirement on a tour is the kick-turn. Until this is nailed by everyone in the party you will need the lead and tail to coach the team. One prudent measure that you can deploy as a rule is to never kick-turn above danger. Try to make your kick turn zones in or above bushes, trees or grasses and on the flattest patch available. If this isn’t possible be prepared to hang back and ‘spot’ (like bouldering or gymnastics) and coach the person through the turn from immediately down hill of the turn. This means you are ready to arrest a slide, and ideally, in reach to help flip an errant ski tail around the turn. A sketchy exposed kick turn on hard snow with poor skin purchase is for some, well beyond the comfort zone of intro and intermediate participants.
If you are in intro or intermediate participant, watch the videos and find a steep slope in the 20˚ range and get this nailed. Take two steps, kick turn, and repeat… you will get it soon enough.
Boot Packing: sometimes the smarter choice
Ok, the chips are down. The surface has turned to a horrible 5mm breakable crust, the party is struggling to ski it… skins on doesnt help, so its safest to get off the planks. Alternatively the surface is hardening, ski edges are skating, some people don’t have ski/split crampons, and there is only short distance back to a bench before an easy low angled skin out. Its time to ‘A’frame the skis, or simply shoulder them and ‘boot - out’. Key things to consider are to get that transition safe as its often unfamiliar for people to transition ‘mid-slope’. Kick out a bench with your skis, then detach and kick it out further… back and forth. Dropping things is a real problem with a mid-slope transition.
Secure skis/split to the pack (‘A’frame, ski on each side and ski strapped on top) or themselves as over the shoulder. ‘A’ framing is longer to rig but gives better balance, and enables a ski stock in each hand. If you haven’t done this before do it at home and practice getting it down pat and quick.
Transition time
Transitioning to downhill mode, whipping the skins off a tightening everything is exciting. So exciting that people start frothing on about everything under the sun. Train your enthusiasm to get the transition done right, don’t drop anything, move through the process efficiently and stow your kit neat and fast, so you can stand, next to the leaders pack (an indicator of where’s safest… she might be off scoping things) and the talk to as much as you like, ready and waiting for instruction. It’s a transition, not an excuse for a tea party.
At the bottom, the same goes, only this time you can rehydrate and snack while you chat, having already transitioned!!!
Important, make sure you are always familiar with wether your brakes of leashes are engaged / connected as more backcountry trips are foiled by lost gear than any other human factor.
Poop right! and respect the environment
The mountains provide a valuable environment for experiencing wilderness. Enjoy this freedom! Be considerate of native animals, those you can’t see who live under the snow, or those who share our huts. Respect protected / prohibited areas and seasonal road closures. Tread lightly on the ground, particularly exposed flora on ridges and summits which whilst only tiny can be decades old, and working hard at consolidating otherwise erosion prone terrain. Regrettably it still does not go without saying: "Keep our mountains clean, pack out all trash!". We strongly urge you carry out everything. In more remote areas where public toilets do not exist, familiarity with the use of ‘Poo tubes’, a personal feacal storage container, is a mandate of the backcountry community.