Bluff Hut and surrounds:
The Bluff, Mt Eadley Stoney and Mt Lovick

The snowgums are truely the highlight of touring in this range. Unfortunately abundant old growth snowgums are rare, lending an ancient enchantment to the experience. Mel Clarke, who is ‘mainly in it for the snow gums’ is at frothcon10, shown here on the traverse across Mt Lovick.


The section of the Dividing Range that connects The Bluff with Mt Cobbler (the vast elevated ground viewed east of Mt Stirling/Mt Buller) is a complex and remote area. The range has unique characteristics born of the geography. The western fall of the range is dominated by significant escarpments. The tour outlined here is an introduction to the area. The terrain is classic ‘Intermediate’ stuff, with an ‘Advanced’ headspace due to the remoteness of the area. Out here you are truely on your own. Any rescue contingency outside a blue sky no breeze chopper lift are poor and lengthy.
To heighten the sense of being on your own, the MSC daily bulletin does not actually forecast for the area. You need to glean info from both the Dividing Range and Front Range forecasts out here. This is because the range shares the elevation of the surrounding Front Range, with the Dividing Range orographic lifting characteristics and ‘natural snow making’ that occurs further North.

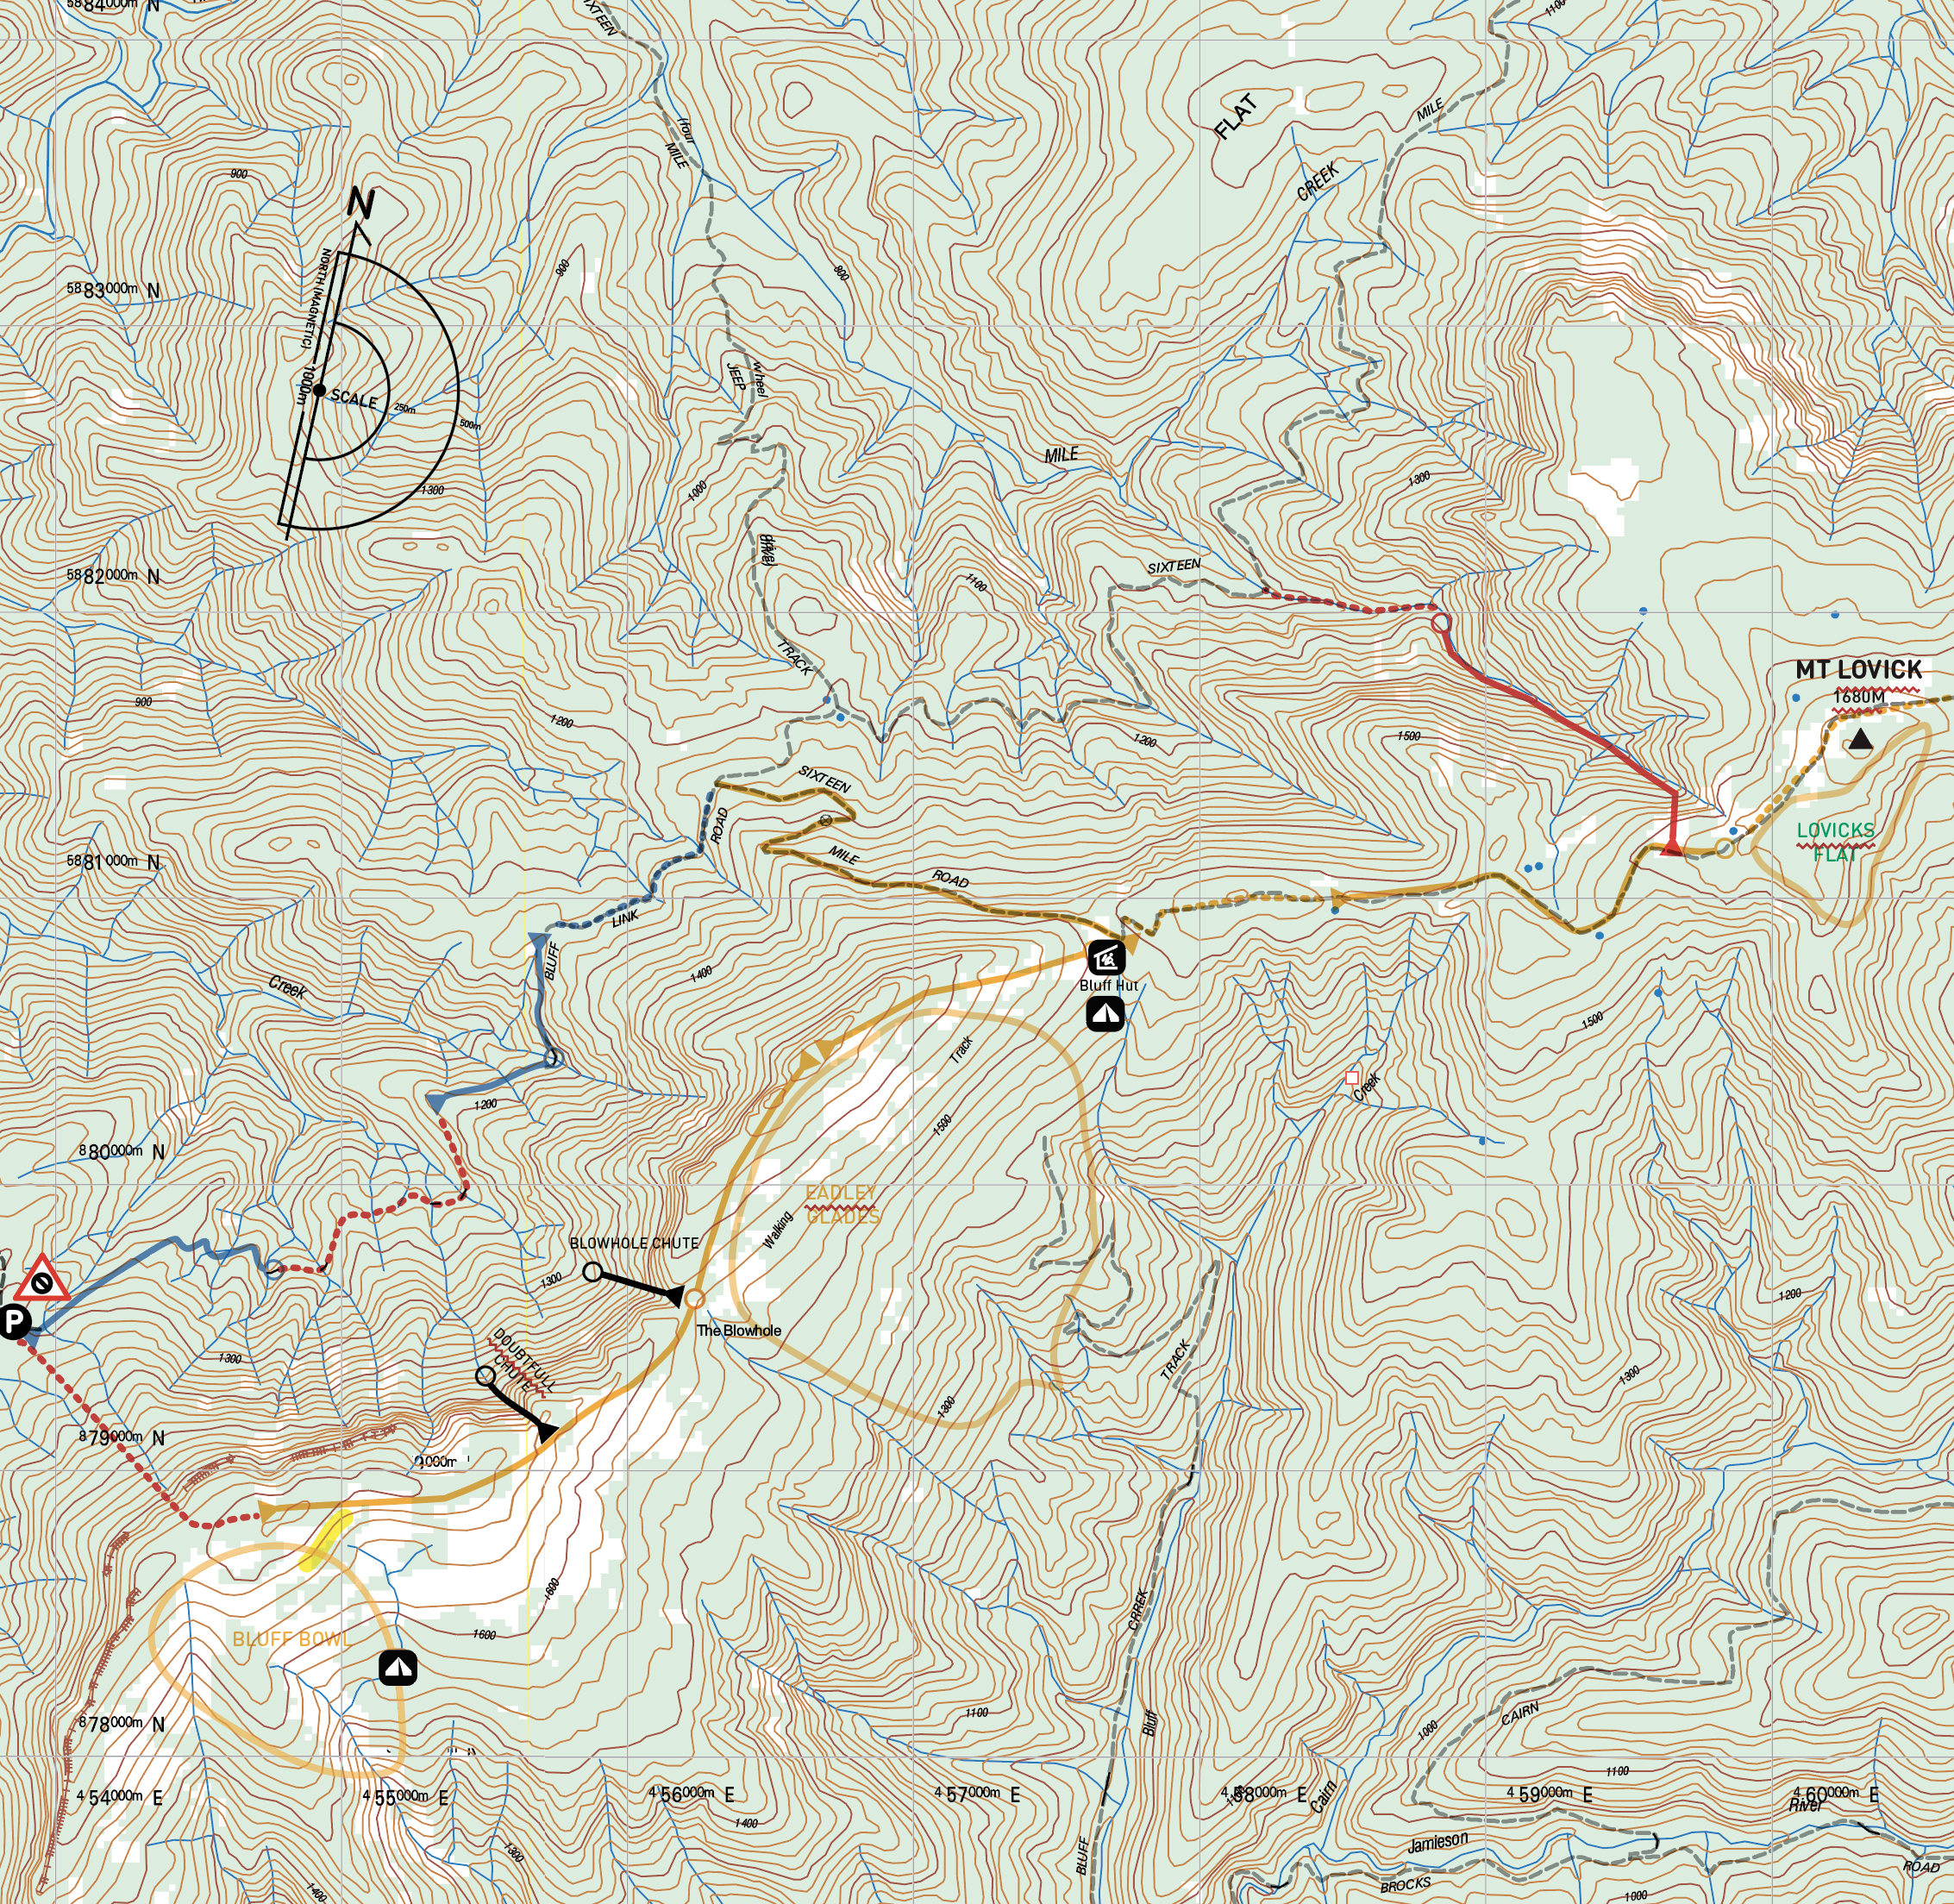
This tour starts at the seasonal road closure on the Bluff Track. Unmarked on the Google map but with this handy little pin, google will take you straight there in 4.5hrs from Melbourne CBD. Or search up ‘Refrigerator Gap’ and the take the bluff track from there to the gate. It’s a straight forward drive on well made dirt tracks with good clearance and pretty grippy surface (unless its really wet, or snowy from refrigerator gap) and ‘doable’ in a 2WD until a the 4WD sign 1km or so short of the gate (Bluff link track + Bluff Track). Chainsaws are always a handy addition to this approach given the extent of fallen timber evident along the way. One way to work out wether you can make it in a 2WD is to see if there is snow at Mt Stirlings ‘Telephone Box Junction’ on the cams, as this is roughly the same elevation and aspect as refrigerator gap. Carry chains regardless in case it snows while you are in there.

You are on pretty much on your own compared to all other areas in the companion. The remote nature of this tour makes it a place to really dial it back and ski to the conditions. Shallow cover is the biggest hazard around here, touring at such low elevations (1200m-1600m). The good news is that there are roads or open glades to follow as an emergency escape and mobile reception is good too strong on all elevated ground and west aspects. The bad news is that there are no emergency sleds or evacuation equipment out here. Having the ability to convert skis into a rescue sled would be a good addition to group safety out here . Not far from here is Mt Buller and Mt Stirling with full mechanised rescue capability. If the situation is bad and you’ve called 000 its worth following up with a call to them if its during open hours ((03) 5777 6532). Note, If you have an incident at Lovick Bowl, and self extract, heading downhill you find the Cairn Creek track at elevation 1400m and then it would be possible to continue to the snow line for an ambulance pick-up. You’d need to coordinate that from the ridge top before hand.

Much of the ground covered in this tours is along 4WD tracks. Pioneered on lite touring gear and telemark gear, I’m sure these hardy souls would have embraced the heel locking abilities of modern alpine touring gear. The roads are narrow and ski like low angled chutes at a technical level dictated by the conditions. Splitboarders will enjoy the consistent uphills / downhills on this tour, sure theres a few flats but it’s pretty good considering. Snowshoers are also found in abundance in the area (many doing the Australian Alpine Walking Track which traverses through here). We strongly urge consideration for shared usership with the establishment of a ‘single file’ track *snowshoers please note, taking the ‘inside lane’ on bends.

Reckoning (knowing where you are)
The track is obvious even in deep snow conditions in most places. There are nav gaps on open glades where making sure you’ve found the continuation of the track might require a moments consideration or a quick glance at the GPS. The road is the handrail with the exception of the broad East facing flank of The Bluff and Mt Eadley Stoney. Here your catching feature is the treeline, which if followed northward will ultimately lead you to the edge of the escarpment above the Bluff Hut saddle. The High elevation handrail is the escarpment itself, obviously if you are using handrail navigation in low visibility, following a cliff top is a very bad idea.
Wayfinding (connecting the dots on a map)
As stated above, way finding is largely following the road and or your outward track as everything converges at Bluff Hut and from there the trail to the car is too obvious. Maps are available here for download for free as well as our GAIA plot here for emergency reckoning (aka. when you are lost). Do not rely solely on digital navigation in the Backcountry. The cold temps are brutal on the charge rate of your devices. Always turn devices off when travelling as they can interfere with avalanche beacon frequencies.
Tour Notes

The view north from the flank of Mt Eagley Stoney toward Mt Lovick at treeline.
Download the Free Map Kit here
Bluff hut and surrounds: print it out and make it you own!!!
Trail head to Bluff Hut.
As mentioned above, depending on the snow line, your approach might start a couple of kilometres before the ‘Season Road Closure’ gate. If you are stopped at Refrigerator gap by snow, it’s going to be a very long tour and a reassessment may be required.
Again, we feel it’s important to reiterate wherever you are on the 4WD track in snow, please be considerate of your, and others, outward journey and keep to the side heading up, and single file, particularly snow shoeing. It may sound like fluffy ski etiquette but it can become a serious safety issue for everyone when the track is pock marked all over with ski and show tracks. Nobody is coming to groom over this mess.
Bluff hut was rebuilt after the 2008 Fires and its a great base for a weekend or more.
From the gate, it’s a steady one and a half kilometre haul up to the Hut with an elevation gain of 170m. Easy done if it’s a day trip, less so with overnight gear. At the hut you find well appointed (new even) purpose built accomodation with plenty of space and big benches and tables, with a fire at one end.
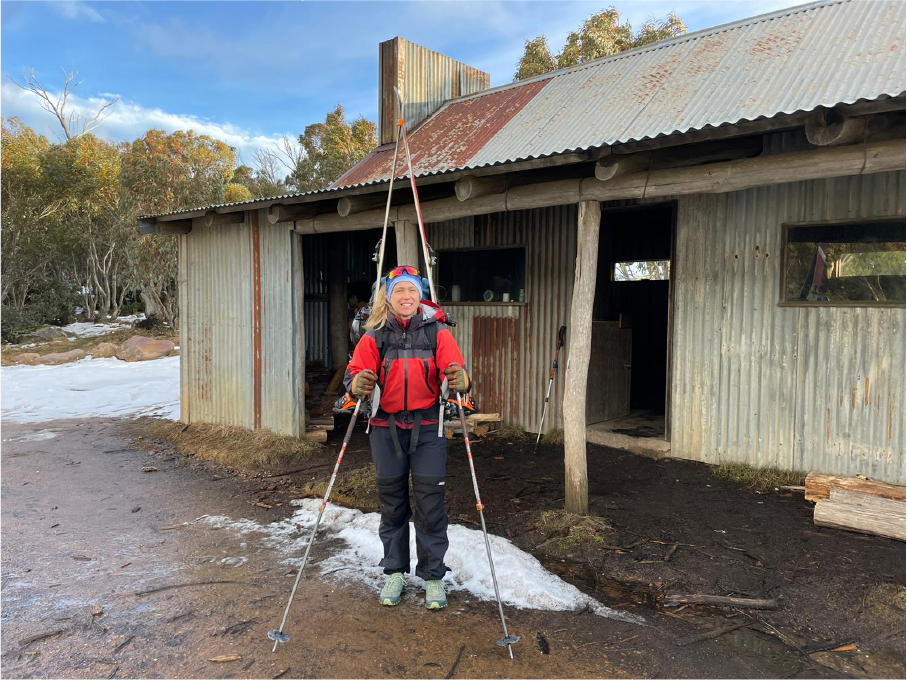
Cute Hut! Dash and Mel are super psyched at this point… We failed to get to our objective at Vallejo Gantner Hut with shallow cover, and had spent two nights on the floor of Lovicks hut, Bluff Hut here felt like a tidy, windproof haven.
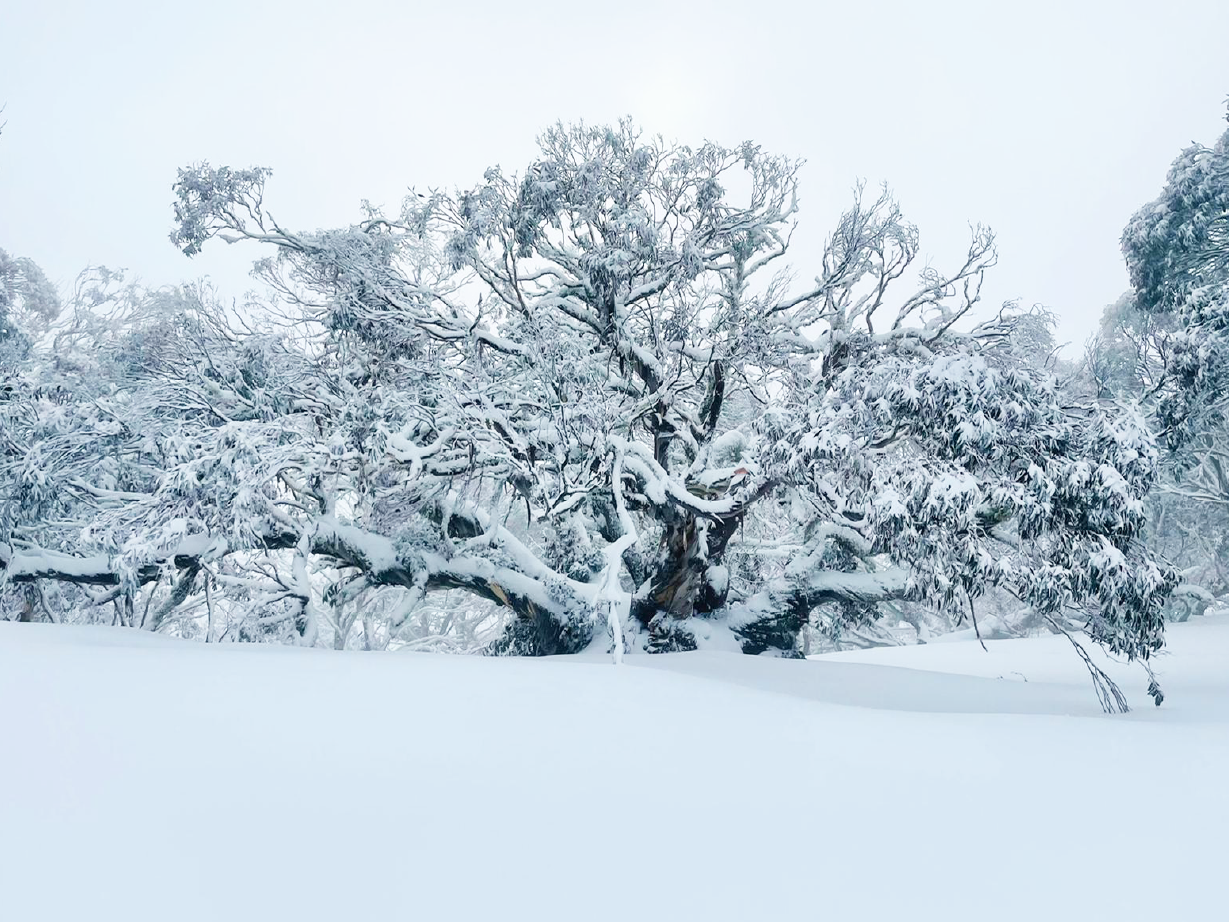
Ancient Snow Gum Splendour. Photo: Mel Clarke
Mt Lovick and Lovick Bowl from Bluff hut
From the front door of the hut, the track to Mt Lovick is across the horse yard. Once you have picked it up its pretty obvious, or you can just head straight up to the broad spur to the top and avoid the zigzagging track. From the highpoint of this knoll, keep the skins on for an undulating eastward ridge top for 300m or so. The track then ascends again to a saddle on the ridge where it swings South East (this North aspect could have low shallow cover). After another short undulating section of 300m, the track Heads up to Mt Lovick a kilometre distant. At elevation 1650m the track crosses an open plain. This open plain can be accessed as a short cut out of Lovicks Bowl shown in the GPS plot.

Dash tackles some steep ground escaping from Lovicks Lower Bowl.

Mel transitions with the steep cliff bound ground of the ‘lower lovicks’ area behind.
Lovicks Bowl
Lovicks Bowl is the East and South facing flank of the long Mt Lovick Summit. Similar in scale and aspect to Mt Stirlings - Stanleys Bowl. With the significant exception of 30m cliff bands on the north flank and also mid slope in the 30˚ sections.
Expert Terrain.
Important: Some of this area is steep enough to avalanche and the large open face should be avoided by intermediate parties. Adequate avalanche assessment and rescue training required. Also, sections of the central bowl end in cliffs, anything north of the main creek line for a distance of 70m is Advanced terrain.
Intermediate Area:
From the summit it is possible to pick a line of descent at no greater than 20˚ sticking to the trees on the skiers right of the outward south most end of the summit mound and trending to the right, follow interconnecting glades down to an elevation of 1600m, or lower depending on snow depth. Transition and retrace your descent uphill until elevation 1650m where its possible to traverse out to the open plain observed earlier, or pick a way up through the forest back to the top and repeat. Explore and you will find more…
The trip back to Bluff hut from the summit of Mt Lovicks takes about 30/40 mins with decent cover and a bit of a scootch on the undulating sections.
Note: The south West face immediately skiers left at elevation 1550m on the descent is/was skied back in the day. Known as Bluff Creek Crags, it looks pretty gnarly really so we are simply acknowledging its presence here, this is not a recommendation or suggestion. In a similar vein (acknowledgment not recommendation), the gully facing west from the open plain before Mt Lovick was also skied back in the day, in one case all the way to the Bluff Link track at 1200m. Hard to imagine enough snow that low on that aspect, it too looks pretty treed and gnarly now days.
Beyond Mt Lovick
Beyond the top of Mt Lovick the trail extends along the ridge before descending gently then abruptly into the saddle above the junction of Cairn Creek track and The Bluff Track. In the saddle you will find Lovicks Hut. This is real 4WD country here, the hut, like its custodians is rough. It shares a resemblance to a bogged and rusted out FJ40 and is about as charming as that sounds inside too.

Lovicks Hut. Photo: Mel Clarke
Beyond Lovicks hut the road continues out toward the King Billy range and intersects with the continuing Divide to cross over onto Mt Magdala / Howitt / The Crosscut Saw / Speculation and then Mt Cobbler. See the section in ‘Southern Traverse’ section in Advanced tours
Back at Bluff Hut…

Mt Eadley Stoney
This time from the back door of the hut head upward ever upward in a South East direction through the recently burnt black gum stags. Your first objective is the Mt Eadley Stoney (1685m). This is simply a high point on a sharp escarpment that extends from Bluff Hut to beyond The Bluff summit (1726m) with the westward cliff face ranging from 30m to over 150m and sheer in places. Needless to say extreme caution must be used in anything less than good visibility not to overshoot the summits.
From Mt Eadley Stoney transition and head down on a bearing of 180˚ south, roughly, for a distance of 800m or so, down to elevation 1400m. A glorious descent, and reputedly the best intermediate backcountry ski run in the state.

The Bluff
Down in the gladed forest where the trees change from the short gnarly gums to the tall straighter ones, it’s time transition. Head up now onto The Bluff ,following a South West heading through the forest. It’s worth considering your ascent as a possible navigational handrail for your descent if the tree skiing looks mint (not too cruchy and icy) as you can do this section in an ‘out and back’ style.
At the 1680m mark you can decide if you want to take a little dip into the Bluff Bowl proper to avoid the undulating terrain (Splitboarders say yes here usually), either way, the summit sits another 50m vertical beyond this ‘false summit’ at 1730m.
Soak in the expansive vista from Howitt and the Cross Cut and even Buffalo /Bogong / Feathertop beyond, down to Baw Baw. WowHeck! what a view. Soak up some lunch perhaps too. It’s worth observing the flat depression immediately below and West of the summit. This is a great campsite if a night out on the range is the parties desire, or in need of emergency shelter.
And from here there are two logical return options. Retrace your advance, if it looked good on the way up, or cut the corner and connect The Bluff summit with the Blowhole. The blowhole is the saddle between The Bluff and Mt Eadley Stoney. It’s a long traverse that avoids some awesome fall line skiing/riding but hey, if it’s getting late this is a good ‘out’.

Bluff summit: Last rays and soft spring corn, the false summit seen on approach is the lump centre frame.
The Blowhole
The Blowhole (1570m) is the saddle and as the name would suggest, its a windy place and not one to hang around at. Trick is that you can contour from here around at the tree line to get back to the hut (there wont be much slide with 50m elevation drop in 1.5km), or head up. This decision is dependent on the weather as both take the same amount of time. If you have good weather, make the most of the slide by heading back up to the Eadley Stoney summit, if not stay low and safe.