Mount Feathertop and approaches
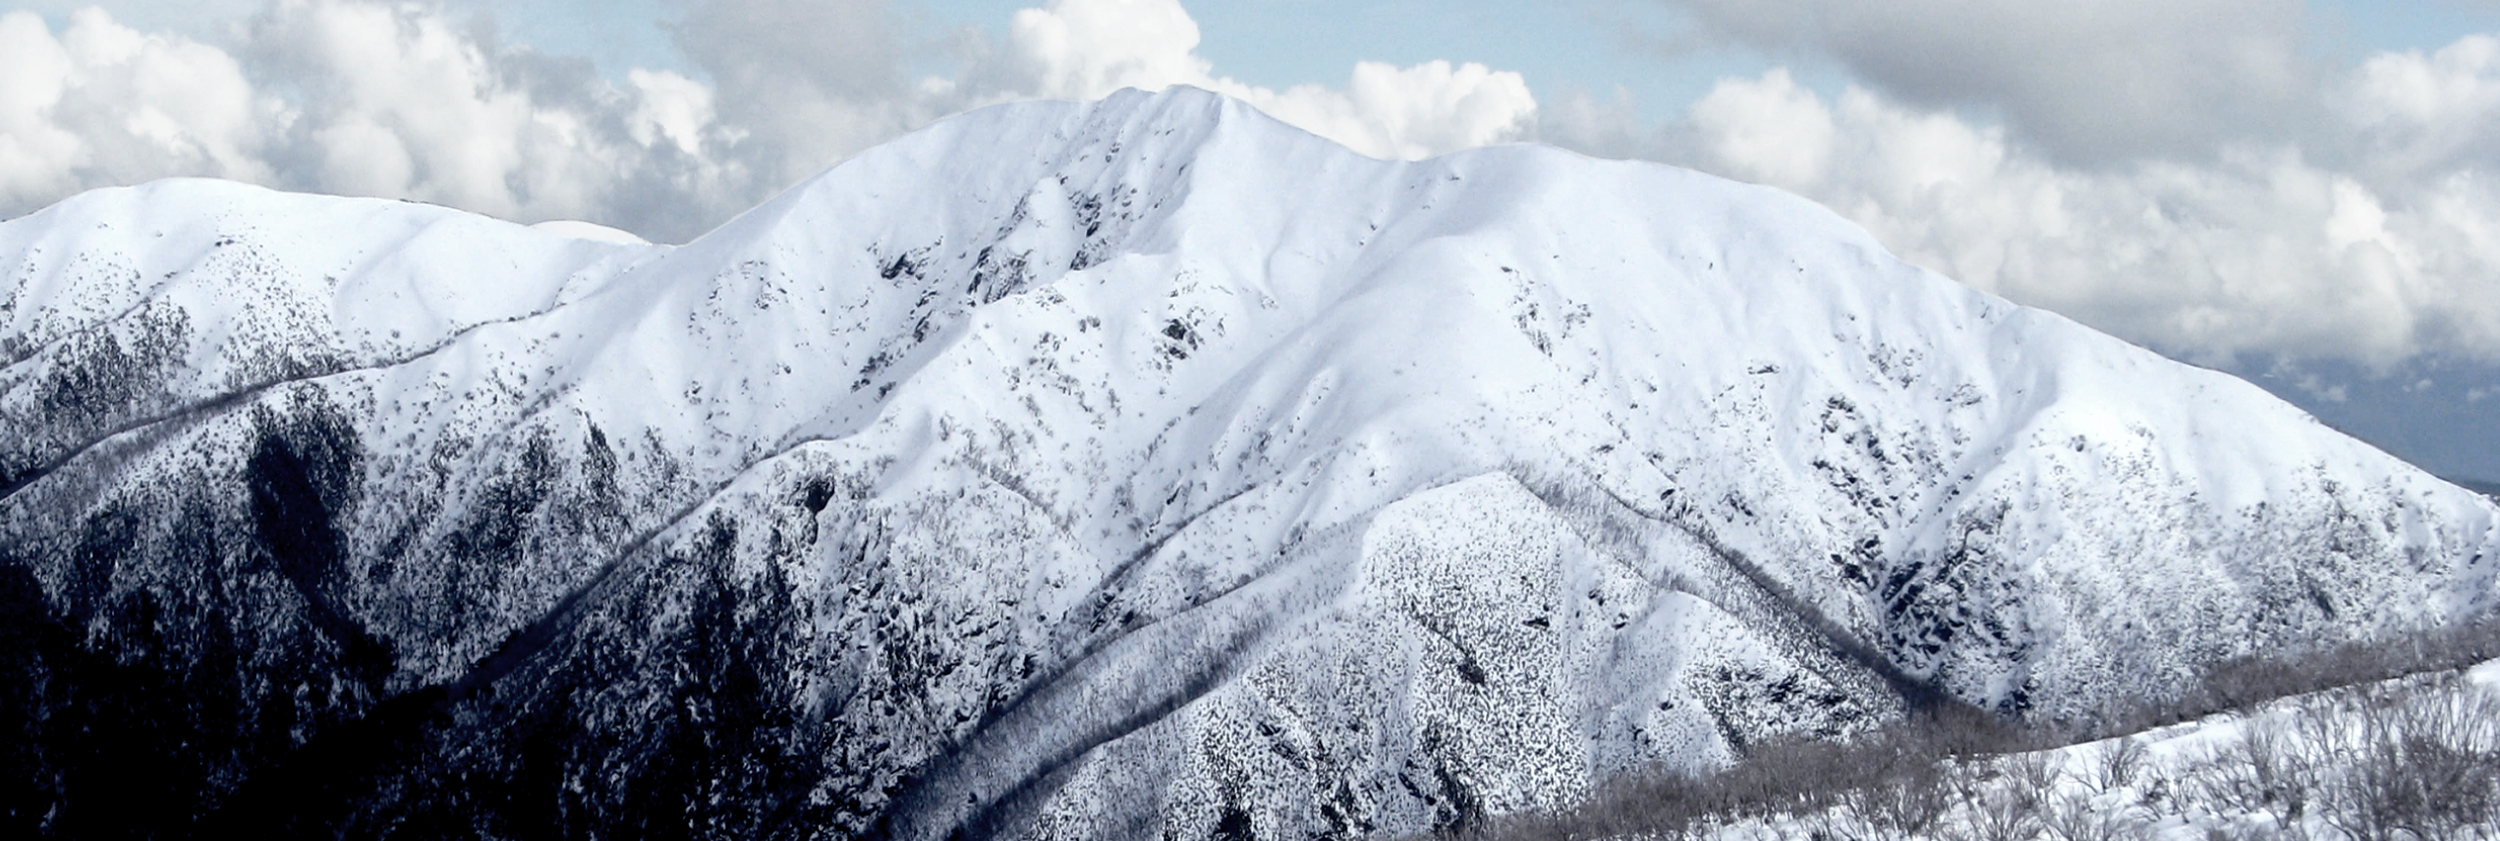
Mount Feathertop North and East faces as seen from Mt Jaitmathang. Image courtesy of The Mountain Journal

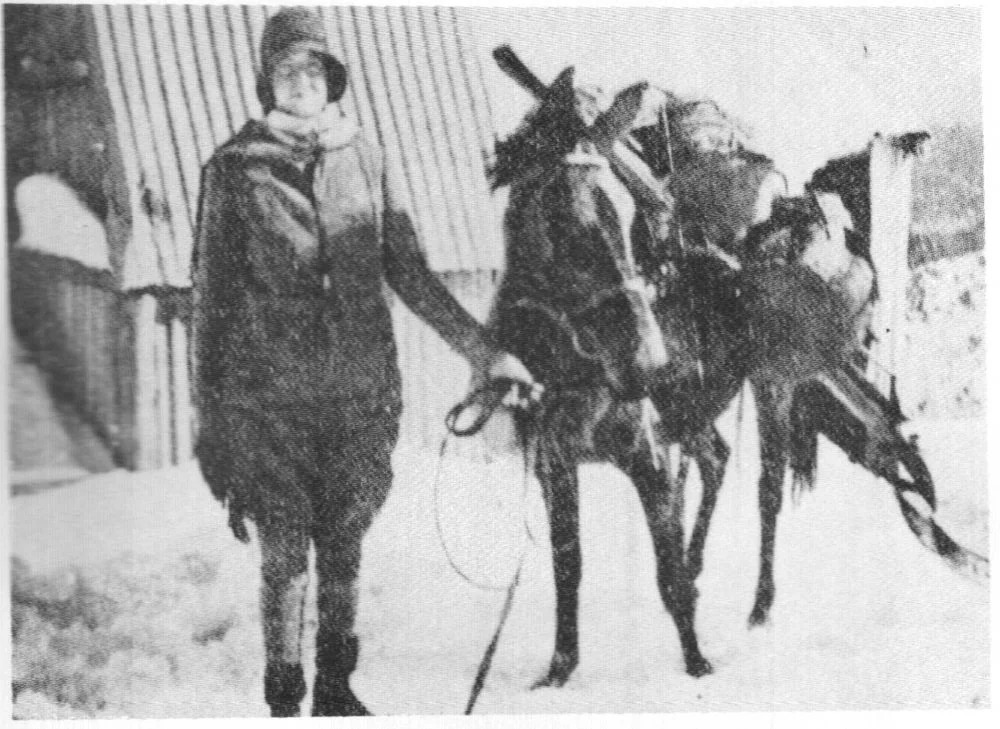
Early skiers on Mt Feathertop, possibly at the 1923 carnival, the precursor to the Victorian Backcountry Festival. Photo: Robert Macedon O'Brien. Source State Library of Victoria.
Mount Feathertop needs no introduction. This is where steep skiing started in Victoria. This is the mountain that whilst slightly lower than the states highest Mt Bogong, captivates the imaginiation of both ‘would be’ and ‘seasoned’ alpinists to this day.
We aren’t going to delve into the history of the mountain in detail as David Sisson has covered that eloquently here already: Mt Feathertop: history, huts and hikes. Australia’s Mainland Matterhorn? The jewel in the crown of the Vic Alps, home of the brave… certainly the state’s most commanding alpine peak. As a skiing objective Feathertop combines pretty serious approaches with the summit as the prize and epic descents all round. The Peak itself is actually the highest point of the Razorback Ridge. This high alpine ridgeline ascends to form the range that separates the Kiewa and Ovens Valleys. From the saddle below Pyramid Hill the ‘Razorback’ forms and from here maintains, in a southerly direction, an elevation above 1400m for over 20km to the distant Mt Hotham (1861m), traversing Feathertop North Peak, Mt Feathertop, Cairn Hill, Twin Knobs, Telleson Point, Washington Point and The Big and Little Dippers (all above 1700m) to the intersection with the Great Alpine Road at Diamatina Hut.
This is spectacular country to visit in any season. On skis it is probably the most technical and demanding tour area covered in the Companion along side Mt Bogong. The terrain in the immediate vicinity of this peak is some of the steepest and least forgiving ski terrain in the country, easily rivalling the western fall of the Main Range. This country demands fitness, requires respect and an understanding of the elements, in return it rewards the tourer with vantages and terrain that are world class. The huddle of experienced alpinists that call Harrietville home stands as a testament to the draw of Mt Feathertop, which conveniently for them extends a SW ridge, the Bungalow Spur, down to the mountain hamlet starting at the cool deep waters of the Tronoh Dredge Hole, a block back from the main drag. This is where we will start as the alternative approach 02 ‘South Razorback’ covered earlier as an intermediate tour connects with this itinerary at Cairn/Mollys Hill.

Dial in ‘Tronoh Hole’ to Google Maps and follow it to the carpark. Whilst not the trailhead this is the preferred car parking option, requiring you to walk up Feathertop Lane to access the trailhead. Park for free, let you legs pay the park entry price… Toilets available and usually a few trout in the pond.

Much of what puts Feathertop so ‘out there’ are the really challenging emergency contingencies. There are basically only two. Furno / stretcher down Bungalow Spur which will be long and tiring for all involved (stretcher is stored in Federation Hut BTW) or a VicPol / Ambo helicopter lift. The latter requiring low winds and good visibility which is not the norm on this mountain. Call 000 and request rescue. Have the lat/long coordinates ready and wait for instruction. It’s unlikely that a party will self-extract unless the incident is mild, or they come very well prepared. Obviously good wilderness first aid practices are therefore essential and digging in and waiting with your patient will be a likely outcome so always travel with plenty of Hype-wrapping and take a safety very seriously.

The tour is described to suit alpine touring, NTN telemark and split-boarding disciplines. As an advanced tour the notes describe travelling through avalanche terrain and with that falls the responsibility that parties need to know the ‘rules of engagement’ and keep themselves safe. Check the forecast. Stay clear of cornices while also being conscious of falls on ice on shallow or steep gradient terrain and expect dramatic variation in surface conditions between the solar and shaded aspects on macro (buttresses and ridges / East & west) and micro features (shallow concavities and outcrops), particularly on the South and East aspects. Feathertop has a well earned reputation as a hard mountain so make sure all your kit is in good condition and serviced, as gear failure out here will create big challenges.

This tour requires some significant navigational nous. The use of handrail navigation techniques works well as the ridges are your reckoning. In places where there are summer tracks it’s often very hard to locate them without a GPS and usually not worthwhile as they will be encumbered with low hanging limbs and fraught with challenges.

01. Tronoh (Dredge) Hole to Federation Hut .
Plug in that favourite mixtape and get your plod on people. Something of a ski mountaineering pilgrimage, the Bungalow hike is a consistent incline for xxkm. First stop at 2.2km is Picture Point (300m vert gain), an arid vantage point to ‘bong on’ as the signage (or local teens) suggests… Tobias Gap at 4.4km is in the tall forest and 600m elevation gain often holds a crusty rime of rotten snow, slippery first thing in the morning. This is then followed by Wombat Gap and the Dead Tree corner at the elevation of 1350m. This is, in a decent year, the limit of the skinable cover. Usually the foot traffic from walkers / snowshoers through here renders the area unskiable up or down, so just see how you go. At 7.8km from the trailhead you reach the old Feathertop Bungalow site (1525m). 1000m elevation gain to here.

Bungalow Spur was first pioneered as a stock horse route to the first Victorian ski infrastructure ‘The Bungalow’.

Federation Hut: Image courtesy of Daniel Sherwins handy https://www.backcountryhuts.net/huts/federation-hut/

Federation Hut is only 200m vert gain at a distance of 1km further, most of the track is on a south west aspect that holds snow for a while. The hut is sited on a flat in the shallow saddle below Little Feathertop.
500m further toward Mt Feathertop, as the track sidles from the south side of Little Feathertop you will encounter the intersection of the Razorback track, that heads south from here to Mt Hotham. Picking up this track is hard in deeper snow cover where parties deciding to head south usually make for the top of Cairn Hill and follow the ridge. Continue NE for another 200m to the ‘saddle’. From here the choice of routes is limited to the ridgeline, that is if you are not seduced into skiing the ‘Saddle Chute’ or ‘Introductory bowl’ which is immediately ESE of the ridge at the saddle. To the summit from the saddle along the West Ridge is normally rimed, and often slow to thaw and as such (ski/split/boot) crampons are advised for any upward travel beyond the saddle (and a whippet or axe is never a bad idea in the winter). There’s a traverse here across the NW face to the NW ridge which is vague at best.
Important Note: everything beyond the saddle has avalanche potential. Yellow areas marked on topos are known / observed avalanche terrain. Orange descents are still Advanced terrain with slightly lower consequence.

Mount Feathertop viewed from the approach on the Cairn/Mollys Hill or the saddle.
Introductory Bowl
This, as the name suggests, a great place to familiarise yourself with the mountain, and importantly the avalanche conditions. This is a good place to poke around in the snowpack looking for weak layers on the varied aspects. ‘One trip, we marched in 4 hours on the tail of a storm, got consistent compression test scores in the single figures on a hard crust with a steep temperature gradient on the east and south aspects, and given every other aspect was bulletproof ice, promptly turned on our heels and walked straight back out’. A cornice usually encircles the south east ridge top.

This is the alternative view looking south at the saddle from the end of machinery spur.
Most parties make a hot lap here for information gathering and a warm up. There are plenty of options here with aesthetic gullys and rocky ridges forming chutes in the centre of the bowl. The drainage can be followed to as low as 1500m into Feathertop Creek. This isn’t a bad idea to go deep as it will introduce you to the conditions of the day and prepare the escape option (put the skin track in) for the bigger alpine objectives on East Face descents like The Diamatina face and the ‘Hype’ ridge. The usual escape route takes the creek up to the east facing flank, lookers left of the two rocky ridges marked as ‘Introductory bowl’ on the map. The easiest way in and out.


Grim Tales:
Victorian Minister Tim Holding disappeared at the mountain on 31 August 2009 when he failed to return from his solo hiking journey. Sixty searchers were deployed in the field by Monday evening, 31 August 2009, including Victorian Police Search and Rescue, Mt Hotham Ski Patrol, Bush Search and Rescue and the State Emergency Service. He was found during the morning on Tuesday 1 September, one day after searchers were deployed on Monday. Uninjured, he reported that he had lost his footing on an icy slope, and slid down into a gully. Disoriented, and with poor visibility, he waited for rescue, using a reflective space blanket to attract attention.
Graeme Nelson, a 56-year-old doctor from Eden in south-eastern New South Wales, a longtime regular visitor of the mountain, died on 24 August 2011 while skiing with friends in Avalanche Gully on Mount Feathertop. Dr Nelson is believed to have slipped in icy conditions and fell 700 metres down an icy slope, dying before his skiing companions could climb down to reach him.
Tom Kneen, cousin of Peter Kneen who designed the MUMC Hut, died in August 1985 when he and three companions strayed onto the snow cornice in a whiteout near the summit.
Steven Galland died on Feathertop in 1983 when he fell whilst digging a snow cave on an MUMC trip.
South of the summit pyramid at the start of the Razorback there is a hill with a small cairn and a plaque in remembrance of Molly Hill who may have been the first skier to die in Victoria. Mary (Molly) Ann Hill was with a group from the Ski Club of Victoria that was stuck at the Feathertop Bungalow during six days of poor weather. On Friday 2 September 1932 a group of six set out for Hotham Heights. After they climbed to the Razorback, Molly slipped on a steep patch of ice and slid over 60 metres down a steep slope before hitting a tree. A rescue party was quickly organised and she was stretchered to Harrietville from where she was driven to hospital in Bright. Molly Hill died of head injuries later that night and was buried in the Cheltenham cemetery.
We will now do an anti-clockwise lap around the mountain, starting on the south face, then east, the North and finish on the west aspects.
Feathertop:
South and East Aspects
Feathertop South face
From the saddle, as the ridge steepens to the summit, immediately on the right is the south face. The South Face spectacle is daunting as the corniced shoulder presents a 50˚ wall bordered by a rock spine on the easternmost edge, usually cross loaded and or rimed. The south face is a place most avoid. Lower down the south face mellows where it intersects with a subsidiary ridge. The drainage east of the ridge and rock spine is the famous Diamatina face.
Diamatina Face ***
Find the flat spot on the ridgeline just below the 1900m mark is the intersection of the Hype (Hypotenuse) Ridge. A drift often bridges the cornice at this point and grants access to the expanse of the Diamatina face of which Hype ridge forms the skiers left hand boundary. From here a fall line descent of 400 vertical metres delivers you to Feathertop Creek. Approaching the treeline most people opt for the skiers right gully which tightens and becomes treed just before the creek. All options here ‘go’, even picking up the subsidiary spur low down on the south face for something different. Amazing terrain, one of the outstanding faces in the country and a must for any advanced skier/rider in the country.
Diamatina Face spring corn late afternoon magic with Dr Burner Drewlowicz heading to camp at the Crowsnest. shot: Dylan Robinson
Hypotenuse ‘Hype’ Ridge ***
From the same drift ramp as the Diamatina face this descent follows the ridge proper between the Diamatina and Avalanche faces and forms the obvious skyline seen from the west (top right of skier in the shot above). Follow the gentle ridge top out to the top of the hype face as it aprons out from the apex of the ridge. The ridge that forms on the right at the bottom of this face at 1650m is the Crowsnest, possibly one of the most spectacular campsites on the range, with a tennis court sized flat spot at 1620m and another smaller more sheltered bus stop area at 1580. These campsites are for the prepared, with a good potential for an arduous escape in storm or deep freeze conditions. Get the familiar with the place before overnighting out here on the East Face. Two ‘tree chute’ descents to Feathertop Creek and Introductory Bowl exist low on the west side ridge at 1700m and 1620m. Scope these from the saddle so you have them dialled.
Avalanche Face (Expert terrain)
WARNING: The information here is provided for reference purposes only and not advice for Advanced skiers as this area, due to the possible fatal consequences of a fall is categorically Expert terrain) The Avalanche face is the hidden terrain extending to the north (skiers left) of the Hype Ridge. The Avalanche face, as the name suggests is situated on the perfect aspect to accumulate snow in a westerly and southerly advancing low pressure systems, it's the perfect pitch for avalanches and facing true east thus it warms rapidly as sun emerges after a storm. Couple that with the fact that the middle of the face contains multiple obscured 10-30m cliffs, rendering most of the face a ‘no fall zone’. And for good measure the face is shrouded in colossal cornices that calve off multiple times per season as evidenced by the persistent debris found at ‘the choke’ in Avalanche Gully below. Those are the bad bits, and pretty much the standard hazards for the East face extending from here north to the East Ridge.

The up side is that for those looking to do challenging committing skiing/riding, weighing all the hazards, in a spectacular alpine setting then go no further.
For Expert skiers, at least get this area dialled in as this face provides the escape route to the downright ‘Extreme’ Central Buttress which it borders and the Ampitheatre around the corner. There’s really no obvious defined route, it’s a freeride playground.

WARNING: The information here is provided for reference purposes only and not advice for Advanced skiers as this area, due to the possible fatal consequences of a fall is categorically Expert terrain.
Central Buttress (Expert Terrain)
This is not a place for us to even provide guidance as the editors themselves have only watched people ski it, never have lucked the conditions to feel confident in to ski any of it. The buttress itself does not really yield any obvious ‘stand out’ lines aside the avalanche gully on its west drainage. However climbing the buttress via the prominent ridgeline is a popular outing that some declare to be the best Alpine climbing objective in the state. Admittedly we are not blessed with many and as such this ‘takes the cake’. One perspective from the locals is that you need a freezing level of 2400m to gain enough melt on the surface to afford a safe descent. Provided simply as a rule of thumb.

Shaun ‘Mountain Goat’ Mittwollen front points the Central Buttress to scope ‘Head wall’, the chute left of shot. Probably the hardest descent in the state, complete with unavoidable cliffs and a generall pitch of 50˚ for the upper 100m of vert. Credit: Shaun Mitwollen Collection
The Amphitheatre (Expert Terrain)
WARNING: The information here is provided for reference purposes only and not advice for Advanced skiers as this area, due to the possible fatal consequences of a fall is categorically Expert terrain)
This is the area East of the Central Buttress. A steep cirque like formation with spires, cute little chevals tops and steep chutes. Getting over the summit cornice which shrouds the entire area often requires a bit of serious mitigation and rope work depending on how it has formed in any given season. The summit itself is usually ramped out above The ‘Headwall’. Also a climbing objective in its own right as an indicator of steepness is the standout feature, from the very summit, it chutes straight down at 50˚+ for 100m of vertical before kicking back to a more amenable 45˚ all the way down to the junction with Avalanche Gully. Likely in the upper echelons difficulty of anything skied in the country and commanding of respect. Everything skiers left of the ‘Headwall’ exists mainly in folklore, and shrouded by cornice hazard. Lucky last, the ‘soft touch’ in this vicinity gets a fair bit of traffic. It follows the South East Ridge (which often has a cornice ‘blow out’ where it intersects the summit ridge) to the point where it kicks right roughly 80m down, this is where ‘Lucky Last’ dives hard right into the amphitheatre. The snow deposition is strangely ‘up slope’ here usually with the cornice forming to the north side of the South East ridge, an anomaly yet it negates both cornice collapse and wind loading which around here makes it a smart pick if you must ski the ‘theatre’.

Mid slope in the 45˚+ section of the Ampitheatre chute: hold that backside edge! Credit: Shaun Mitwollen Collection
If you make it to the bottom of the Central Buttress there are a multitude of escape options although all are hard. Boot pack back up ‘Lucky Last’, or alpine climb either Headwall (beware of cornice collapse on this route particularly in warm conditions) or Central Buttress, both full blown alpine objectives, which make for a ‘big day in the mountains’. Perhaps the easiest of a tough bunch is to skin up to the Crowsnest and out via the Hype Ridge. Most of this area you are lucky to get more than one descent in before the refreeze kicks in and timing is key. In August it gets sun from 11am and shade at 2pm… a very narrow window of opportunity.

Drew showing the ‘blow out’ section that often forms in the cornice around 30m vert down from the top. Credit
Hellfire Gully. *** (Back in advanced terrain again!)
Usually starting from the ‘blow out’ cornice gap above the South East Ridge / Amphitheatre, Hellfire Gully is a broad alpine bowl at roughly 40˚or less with a slightly more more relaxed atmosphere. Not to be underestimated, the whole place is fringed by monster cornices (read also windloading) and the associated game of roulette keeps the place edgy. The big bonus is that it faces East and as such softens quickly. The descents are long and it is possible to descend to 1450m, or around 500m vert, making for some of the longest and continuously steep runs in the state. Craglets and escarpents abound creating plenty of interesting terrain. Much like The Crowsnest camp, Hellfire flat at elevation 1600m on the East ridge provides ‘room with a view’ camping high above the West Kiewa valley. However it is a fair bit more exposed than the Crowsnest to all wind directions. Hellfire flat can be approached in a long downhill traverse from the North East Ridge at 1750m.

The View down into ‘Hell’ with the top of ‘Lucky Last’ visible on the ridge on the right. Super fun stuff and probably the best bet for good surface conditions. Credit
North of the main summit beyond Hellfire Gully is the North Peak. A high hump on the ridge and is a point of reference from here as we head around the peak.
East Ridge and ‘The Feather Face’.
It’s a funny thing that the friendliest terrain of the mountain is furthest from the usual approaches (being South Razorback and Bungalow Spur). The East Ridge is a must for any intermediate back country skier, the problem is that it is surrounded by advanced terrain and the hard bit is getting there. Like a more chilled version of Hype spur the east ridge gives a 450m descent over 1.5km. Pretty sweet long ride.
Dropping left off the East ridge at a steeper 35˚ from the North Peak, is the East face. This vast open alpine face has a bit too much East in it and often shows evidence of large loose wet and wet slab slides. The main face is somewhat treacherous and verges on expert terrain with turrets and crags. The chute on the northern corner of the ace ‘The Feather’ is the source of the mountains name as this nook holds snow when the rest of the face burns off revealing a perfect feather shaped in white on the surrounding dark grass of October. Skis nice too… though a bit spooky when its warm.

North of the North Peak
North of the north peak, following the main ridge you come to a fork at 1830m elevation. We have here in fact two ‘North Ridges’. One is the Magnetic North and the other the True North (slightly North West) and this is a fun way to differentiate them. It is possible to ski from the North Paek down the Magnetic ridge on a fun and really varied journey to around 1550m elevation. The True spur is actually the continuation of the high ground and as such is a part of the razorback, here, beyond the summit known as the North Razorback. The track traverses the ridge all the way out to the stoney tops car park.
Jump ahead to the ‘North West Face’ description for more ski terrain.

02. ‘North Razorback’ Approach to Feathertop Summit
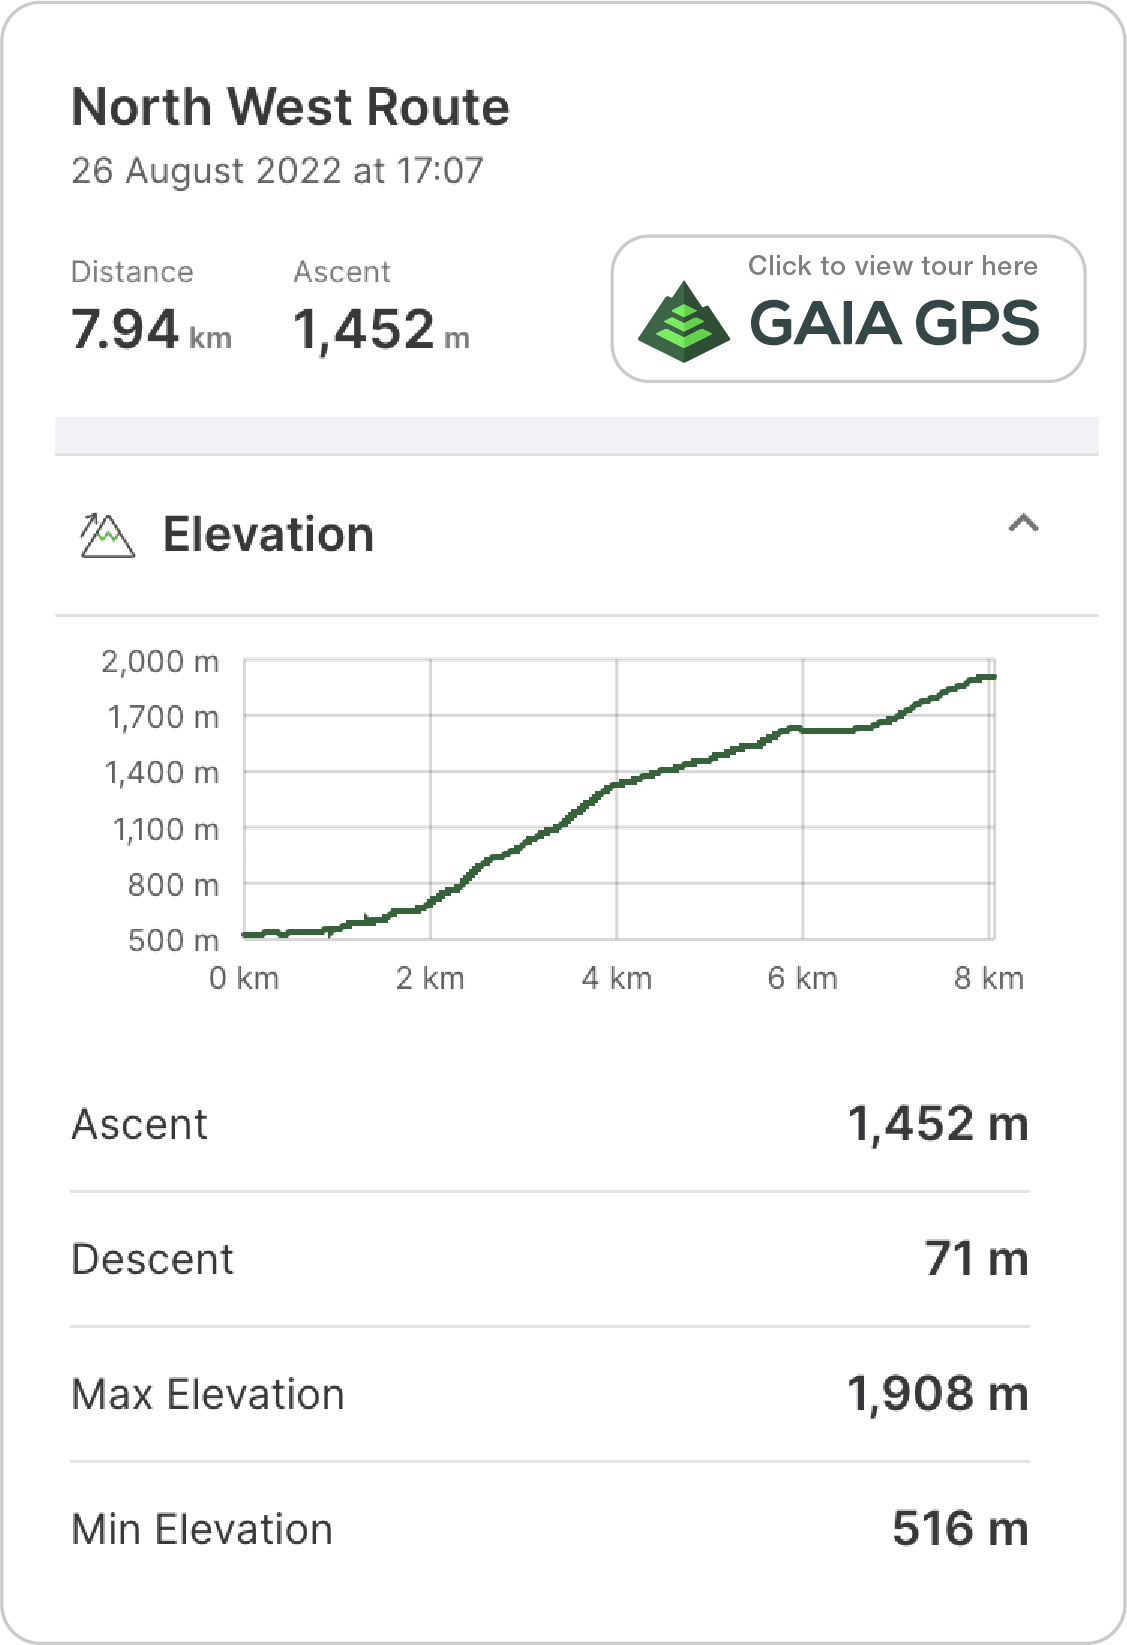
This access requires a reasonably capable 4WD (with chains), carrying a chainsaw and fuel with the knowledge of how to use it. From Bright, follow the Great Alpine Road toward Mt Hotham, turn left at the Mt Beauty / Tawonga Gap Rd, then a hard right immediately after crossing the Ovens River onto the ‘Old Harrietville Rd’. Zero your odometer here. This winds around to eventually head back across a bridge and the river to the Great Alpine Road, before this take the left hand turn at the fork onto Snowy Creek Road. This turns to gravel, then fords a the snowy creek, then at a fork 6.9km from the take the right hand Dungey Track. At 10.3km in take the right fork again onto Stoney Tops Track. This gets a bit steeper and requires caution, at the fork 12.1km is take the right again (these two roads rejoin on the ridge so its lucky dip on which one has the least fallen timber) and wind up onto the steepest section of the climb. It’s rocky so in the wet it is comparatively pretty grippy but caution is always prudent given the long drop down the side. Eventually you gain the trail head 18.1km in, marked with the ubiquitous picnic table and a locked gate. Its a bit of a dingy old hollow. This all takes about an hour or so , with upward revisions for clearing fallen timber. Followed by a brisk two hour ski tour to the first decent campsite. You are now at the start of the Razorback Traverse.
The other challenges of the North spur are born of the aspect geography. Being a northward extending ridgeline at a medium elevation the snow will burn off the approach track early so this is a fair weather, mid winter option. If you head in here on the tail of a big dump then the section from the Summer trailhead (first single track) down to ‘the ditch’ is overhung with dense scrub and under the weight of fresh snow can make travel pretty tough for the first 800m.
Navigation is straight forward enough in that you are on the ridge to the ‘summer Gate’, then the track ducks along the west side of the ridge until at the toe of the final ascent to the summit.
The upside is that this is the quickest, easiest and cheapest way in. Can be skied in and out all the way when there is snow cover to 1300m (mid season objective). The aspect at which you meet the mountain presents ample intermediate terrain on the approach slopes and return from the summit.


MUMC Hut and the North West Spur
The North West Spur offers one of the most challenging and steep approach hikes on Feathertop. As a reward for your valiant efforts, and cold legs, you will have the opportunity to stay in one of the most interesting huts in the Australian Alps. Sitting on a bump along the North West Spur before it plunges down towards Harrietville, MUMC hut is a striking Geodesic Dome shaped building, constructed in 1966 by members of the Melbourne University Mountaineering Club, with building materials brought in by hand and horseback. It has become customary for club members to make an ascent en-masse of the North West Spur at midnight on a full moon evening in August. The hut itself has plenty of floor space, and a suspended upper deck for sleeping. With no wood fire heater, the interior can be rather frigid at times, especially if the occupancy is low. There is ample room for tents in the vicinity of the hut, and a free standing toilet block sits nearby. Untreated rainwater can be obtained via a hand pump from a tank in the basement, which usually remains free of ice. A solar powered USB charging port is also available. The hut is located at an altitude of about 1620m, well above snowline during the Winter, and offers ski access from the door to the summit, making it a great base for a trip or lunch stopping point for a tour from Federation Hut.
To reach the trailhead for the North West Spur driving from the Bright direction, you drive South along the Great Alpine Road towards Harrietville, and about 5km before reaching Harrietville, you take a left hand turn onto Stony Creek Road, where a trout farm is located. Follow Stony Creek Road skirting around to the left side of the trout farm. The road begins to head East and about 300m from the highway you reach the trailhead for the North West Spur track.
The North West Spur track initially follows Stony Creek on its Southern bank for about 1.8km, curving around to the South, until you reach the creek crossing. There used to be a bridge here, but it has since been washed away by flooding. Care must be taken during this crossing lest you lose an item of equipment, or a member of your team, especially when the water level is high, the crossing may be inadvisable. Use of a rope hand line for the crossing may be useful to aid less confident members of your team. The trail continues to lazily follow the creek for about 800m from the crossing, after which it charges steeply up and over a hill and into a moist gulley on the other side with a stream which can be crossed on a wooden bridge.
From here the track climbs very steeply up what is known as “The Wall”. With a pair of skis/board and overnight camping equipment, or a keg of beer on the midnight ascent, this trail can feel very steep and slippery indeed. This is not a popular route, and at times it can become overgrown, or difficult to follow, care must be taken to remain on course. After a challenging 1km, and 400 vertical metres elevation gain, a small knoll and saddle provides a welcome reprieve and snack station, thereupon the mistreatment of your legs continues for about another kilometre before the gradient begins to subside, and you reach some beautiful open glades with tall trees. Here, if the snowline is low and deep enough you may opt to put on planks before continuing up through the snow gums and reaching the shelter of MUMC hut.
From the hut, towards the summit area of Feathertop, the trail continues under the name of the Tom Kneen Track, so named after one of Feathertop’s unfortunate victims during an avalanche/cornice accident near the summit in 1985. The trail heads South from the hut along the spur for about 800m of predominantly flat, but slightly undulating terrain. The views along this portion ridgeline are fantastic, and reminiscent of the Razorback. Here the terrain kicks it up a notch, and you begin ascending the North West Ridge, beware of cornices and wind loading on the steep Southern side of this terrain feature. You have the option to either continue up the ridge to the Summit, or to traverse around following what would be the Summer trail to reach the saddle between Little Feathertop and Mount Feathertop. While it may seem easier, the traverse is still on steep terrain, and slightly exposed to overhead avalanche hazard from the Exhibition Face.
The North West Spur is certainly not the easiest approach route to Feathertop, however, a day tour out to visit MUMC hut from the summit area is definitely worth the effort for those who are looking for an objective with some shelter for lunch, or to escape the crowds at Federation Hut. A loop between Bungalow Spur and North West Spur also offers an interesting variation of adventure, and the distance between the trailheads can easily be covered with some roadside walking, thumbs up or a quick car shuttle.
North Ridge and West Face
From North Peak looking west is a similar prospect to the East Face although in the depths of winter this aspect is the ‘weather face’ and is often scoured, rimed or both. With enough snow to fill in the gullies you can sneak some delightful skiing in. Come spring time this is the shoulder of the hill that usually bakes off really quickly due in part to less coverage, add some warm wind and it sometimes vanishes overnight. The West Face is open and broad with the gullies in at treeline and below providing great steep glade skiing which is not a common around these parts. The large, higher
Exhibition Face
From the true summit (not the North Peak) facing west are three fall line descents. The Spectacle, the North West Ridge that heads out to the MUMC hut or everything South West being the ‘Exhibition Face’. Horrible if the snow or rime is robust, delightful after a few melts into a long melt freeze cycle. Like the North and West faces this too burns off quickly leaving just two runs. Not sure if they have names but the westernmost falls almost directly across from the ridge top start of Hype Spur and the Diamatina face, making for a perfect match of east face in the late morning and then cross over to the west face for the early afterrnoon. Sweet Gig.

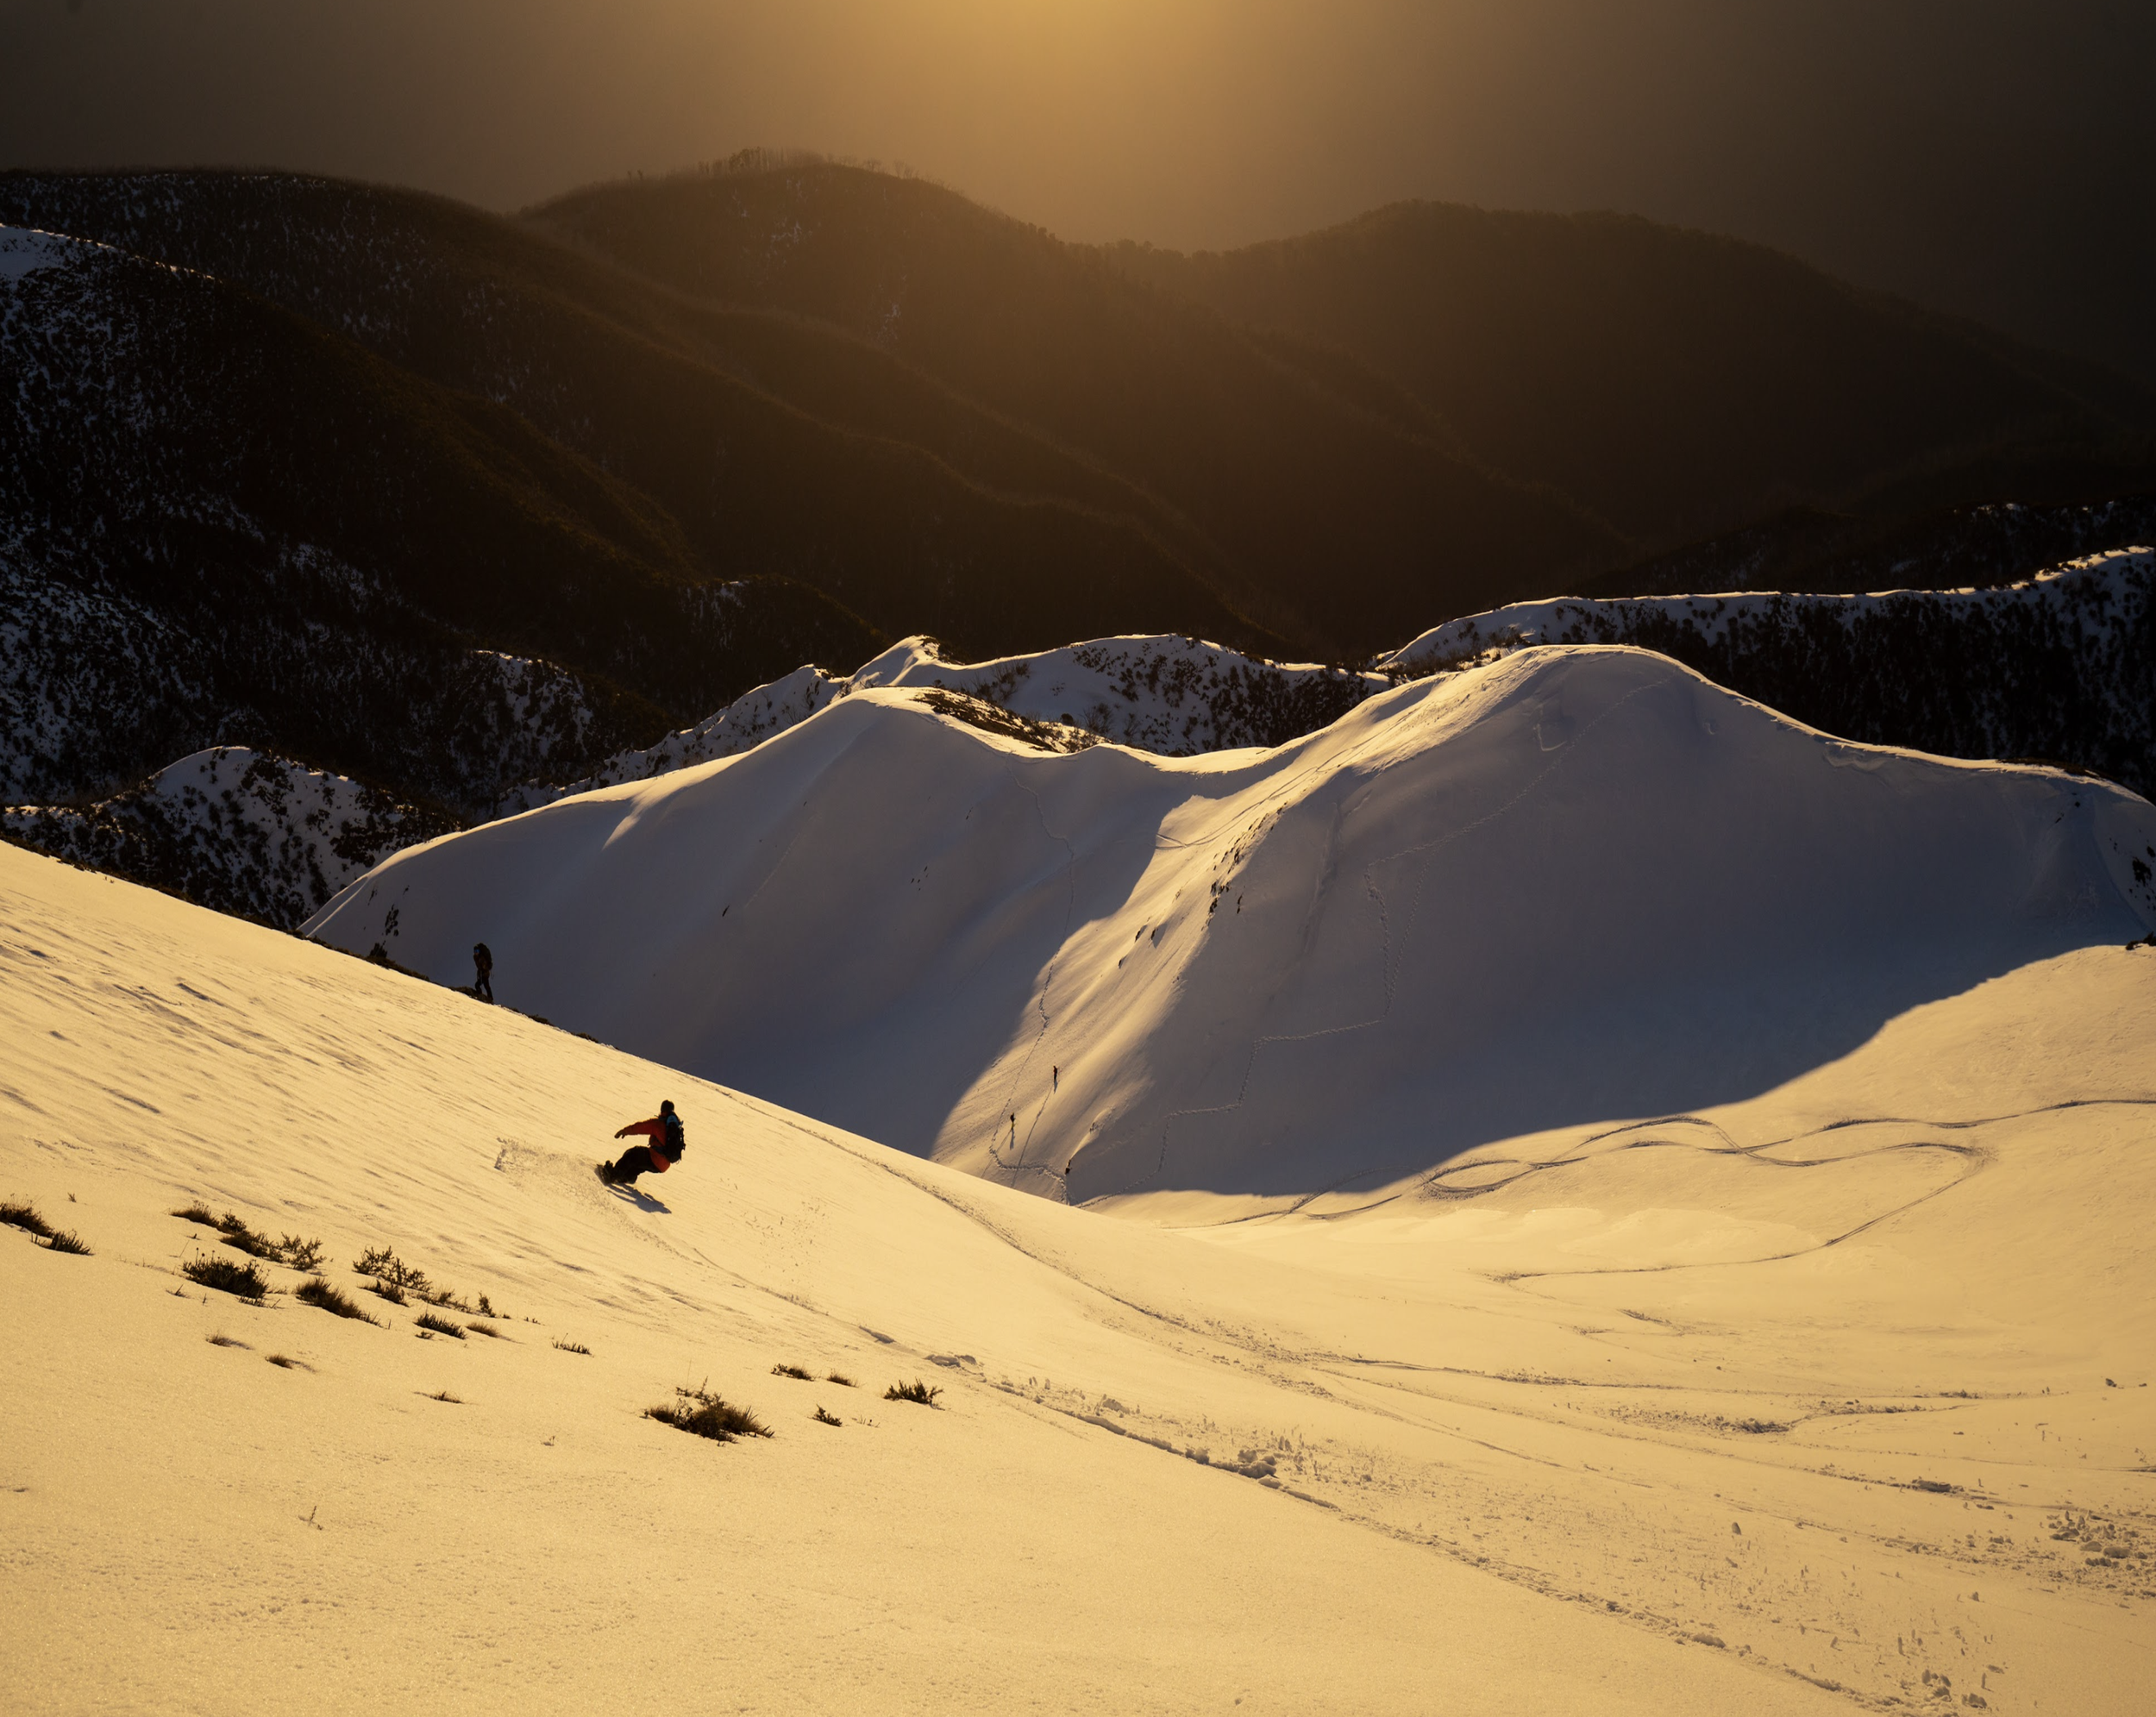
Late season afternoon drop into the Spactacle Credit
And that concludes our wrap of the mountain. There are other places to explore around the hut, but given that it’s usually crowded, we will let those stay secret and leave you all to go hunt em out… or member up and buy the MSC map for the topos. Thanks, see you out there. Simon, Luke and Drew.
More reading on Feathertop:
It’s a fine line here between providing guidance and advice and goading strangers into imminently fatal enterprise so the companion offers this anecdotally. The Companion received the below submission and it spoke of how complex mountains reveal themselves iteratively and at a point, when you have done the time, and you know it well enough, you and the crew can start doing what would have initially seemed foolhardy and outlandish, is completed in total control. Read on…
One day skiing ‘Hype’ the party dropped the wind lip to the ridge and there was what looked like two cornices extending north to the Central Buttress. It was in fact a crown wall of an avalanche, which was very fresh judging by the crisp edge. It was apparent that it had propagated up to the cornice and pulled the lip off that too. It was two days after a 30 something cm dump and the first day that you could see more than 10m in front of you. The crown was perhaps 60cm at most and 100m+ wide, extending to the top of the buttress. The party had a good sense that the new snow that was only a day old hadn't mended hence the choice to ski the gentle 20˚ ridge to ‘Check it out’. Nothing like nature providing its own avalanche mitigation program… the party smiled at each other, pointed skis left and skied the whole of avalanche face from the top to bottom. (taking care not to ski below the hangfire at the top of the gully). This was some members of the parties first time to the very deepest bowels of the east face, 600 vertical meters below the drop in. It was a different world down there, it was hot.. Noisy with the gushing cascades and bird life. And a 20 car pile up of debris at the choke of the gully. They transitioned and headed back up to the saddle before realising that everything that hasn't slid off yet was going to slide as the day warmed. At about half way back up the party realised that it was likely that they’d only be skiing this one line today. Three and a half hours later with countless boot-skin-boot transitions the party regained the summit, gagging and wanting to spew from the continuous steep ascent, savage switchbacks, intermittent bootpacks, too scared to leave the safety of the slidepath or the exposed ridges for fear of getting swept by another slide.
The party had done bigger objectives and had similar experiences abroad that called on everyone making good decisions all day, that day however put the east face of Feathertop squarely in the ‘serious as shit big mountain arena’ for that team. The party thought they got lucky but actually got worked… they rushed the conditions.
Later, with milder ambitions roughly the same party started venturing beyond the summit on the routine morning hike… The north and east faces of the North Peak offered the big vert experience on an aspect that warmed quickly in a freeze/thaw cycle and it all felt pretty friendly by comparison to what lay around the south east corner. As the sun tracked across then you could take a run into the west face… the steep stuff on this side, known as hellfire gully, and contrary to the name is more open actually fun. On this realisation the party started using the North Spur approach in favour over the ‘ol Bungalow’ march. Camping in ‘the ditch’, or even day tripping. The party started developing a stronger familiarity with the approach, which in time provided efficiencies.
On one such day trip the party skied in along the razorback ridge from the Stoney Tops track. It took them just inside three hours from the trailhead to the summit off a dawn start (pre-dawn drive). The early September day was bluebird. The air was still and the warming was rapid. From the summit they were actually looking for snow aspects that had not already baked. The Ampitheatre is the area that sits directly below the summit on the east face, was on this day, with its slightly southerly aspect still firm, warmed by ambient temperatures not the direct baking sun. The party waited a little, favouring a good soft edge over an underbaked crusty one. At the summit, from the intersection of the central buttress and the ridge, a ramp had formed where the cornice is not as steep, skiers left, of ‘the headwall’. With a few tentative pole probes the team dropped in here, skied the spine of the ridge with a few more tentative turns, to a vague promontory on the South East ridge, between the Hellfire gully and the Amphitheatre. From this vantage point the party could see back into the Amphitheatre. Off the ridge the slope angle is all well in the 45˚+ range. Some of the crew dropped in here, while others skied out the ridge to the only ‘fall line’ face without cliffs. ‘Lucky Last’ was a more amenable sub 45˚ slot and looked like a fun blast at that, peppered with some short 1m crags just to keep it spicy. The party made a commitment to a window which they believed would provide the steep skiing conditions given familiarity with the snowpack. The party were all familiar with each other and the loose objectives the conditions might provide. The window was as forecast. The party didn’t ‘get lucky’. They were rewarded for their investment which is the culmination of lots of familiarisation time, teamwork and observation.
At the bottom of the face the party then stepped up, literally, in deciding to ‘escape’ via a bootpack up the Central Buttress for the full ski mountaineering blast, as the usual escape to the south would take them away from ‘the car’. Skinning back up the Amphitheatre was pretty steep and still icy in places. The leaders on the bootpack were familiar with the route. There are spots where the ridge was narrow and steep on all sides and they’d have to mount a few steep steps, the bulk of it is just exposed alpine 50˚to 60˚’grade 2’ postholing, on that day with a firm base giving good purchase. Crampons and a whippet in hand. Working off the confidence they had earned making good calls they made a good day and awesome unforgettable day.
At the carpark, over a beer, at a respectable 4.30pm one of the party made mention that ski mountaineering ‘ doesn’t get much better than that… anywhere’. A perfect day trip in the mountains on an internationally respectable scale of 1450m vert in a 15km round trip.